
Guía completa de Krea 2: estilos, referencias y edición de identidad
 Yifan Zhao12 min de lectura ·
Krea 2 funciona mejor como sistema de control visual por capas que como simple herramienta de texto a imagen. Los prompts controlan el contenido, S-Refs el estilo visual, los Moodboards la estética general, y los flujos de identidad ayudan a preservar al sujeto mientras cambian otros elementos.
El reto es elegir el control adecuado para cada tarea. S-Refs no bloquea un rostro de forma fiable, los Moodboards no son herramientas de identidad, y mezclar estilo, pose, ropa y consistencia en un prompt suele causar deriva. Un mejor flujo de diseño con IA separa exploración, dirección artística, control de identidad y edición por etapas.
Para equipos que amplían este flujo creativo con varios modelos, Virse combina creación con IA y un espacio de diseño basado en lienzo. Los planes de pago incluyen uso ilimitado de más de 40 modelos, entre ellos Nano Banana 2 y GPT Image 2, con plazas ilimitadas. Los nuevos usuarios también reciben créditos gratuitos para hasta 10 imágenes de Nano Banana 2 o un vídeo de Seedance 2.0.
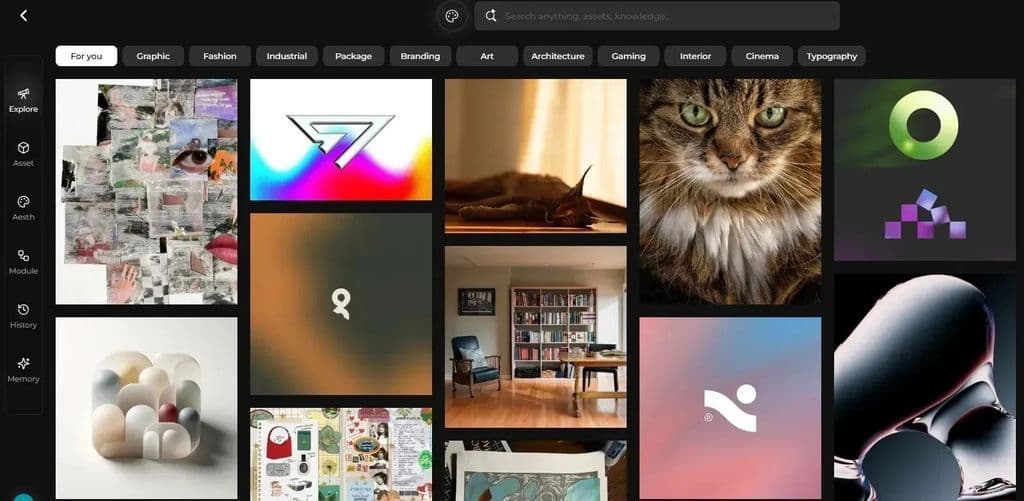
¿Cómo separa Krea 2 estilos, referencias y control de identidad?
Para entender Krea 2, deja de tratar todas las imágenes de entrada como el mismo tipo de referencia. Krea plantea dos preguntas: ¿qué debe aparecer y qué aspecto debe tener? Sus sistemas de referencias y Moodboard llevan esa separación a un flujo de dirección artística más práctico.
Control | Función principal | Ideal para |
|---|---|---|
Prompt | Contenido y dirección de escena | Sujeto, acción, composición |
S-Ref | Lenguaje visual específico | Paleta, textura, luz, estilo |
Varios S-Refs | Mezcla ponderada de estilos | Dirección artística híbrida |
Panel de inspiración (Moodboard) | Dirección estética del conjunto | Universos de marca y sistemas creativos |
Controles generativos (Generative Sliders) | Comportamiento visual | Exploración controlada |
LoRA | Atributos recurrentes aprendidos | Personaje, estilo, objeto, material |
Identity Edit | Preservación durante cambios | Ropa, pose, expresión, contexto |
Desde el diseño de producto, la diferencia clave es sencilla: S-Ref responde «¿Qué aspecto debe tener?». El control de identidad responde «¿Quién o qué debe seguir siendo reconocible?». Confundirlos es una de las formas más rápidas de obtener resultados inconsistentes.
¿Cómo escribir prompts para controlar mejor el estilo en Krea 2?
Empieza breve mientras la dirección creativa siga abierta
Krea 2 está diseñado para explorar visualmente. Un prompt corto deja al modelo proponer composición, color, tratamiento de cámara y dirección estética antes de fijar el concepto.
Un flujo práctico es:
- Define el sujeto y la acción.
- Genera varias direcciones visuales.
- Elige la dirección más sólida.
- Añade cámara, luz, composición, material y textura.
- Añade referencias cuando sea más fácil mostrar la estética que describirla.
Así se reconcilian dos estrategias aparentemente distintas: empieza de forma vaga al explorar y sé específico al producir. Un flujo estructurado de prompts de diseño con IA facilita esa transición deliberada.
Describe decisiones visibles de diseño, no calidad genérica
Cuando la dirección esté clara, sustituye la calidad vaga por decisiones visibles: encuadre contrapicado, poca profundidad de campo, plástico mate, cromo pulido, luz lateral dura, grano de película, desenfoque de movimiento, papel rugoso o rango dinámico bajo.
La meta no es alargar el prompt, sino describir solo las decisiones visuales que aún necesitan control explícito.
¿Cómo funcionan S-Refs y la intensidad de estilo en Krea 2?
Qué transfiere realmente S-Ref de Krea 2
Un S-Ref de Krea 2 transfiere características como color, textura, indicios de composición y cualidad pictórica o fotográfica de una imagen a otro sujeto. Es un mecanismo de control de estilo, no de bloqueo de identidad.
Es útil en campañas: permite mantener tratamientos metálicos, lenguaje de luz, grano o carácter ilustrativo entre gafas, envases, productos e imágenes editoriales sin reescribir toda la estética en cada prompt.
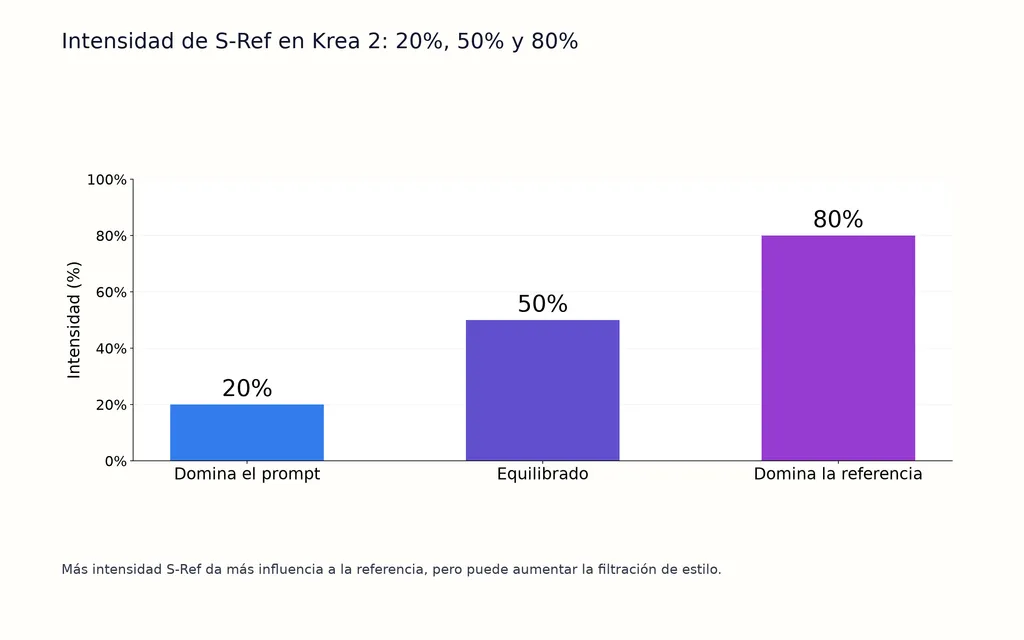
Intensidad de S-Ref en Krea 2: 20%, 50% y 80%
Los ejemplos de Krea muestran esta compensación con especial claridad.
Intensidad de S-Ref | Equilibrio de control | Uso típico |
|---|---|---|
En torno al 20% | Dominan el prompt y el modelo base | Influencia sutil de estilo |
En torno al 50% | Equilibrado | Mejor punto de partida general |
En torno al 80% | Domina la referencia | Coincidencia intensa de estilo |
Con cerca del 20%, la referencia aporta matices de paleta o pintura y el modelo domina. Al 50%, Krea habla de una mezcla equilibrada. Al 80%, la referencia puede dominar paleta, pincelada y composición hasta afectar al propio sujeto.
Ese último comportamiento es filtración de estilo. En producción empezaría cerca del 50%, compararía varias salidas y aumentaría la intensidad solo si la fidelidad estilística fuera claramente insuficiente.
¿Cómo combinar varios S-Refs y Moodboards de Krea 2?
Usa varios S-Refs como capas separadas de dirección artística
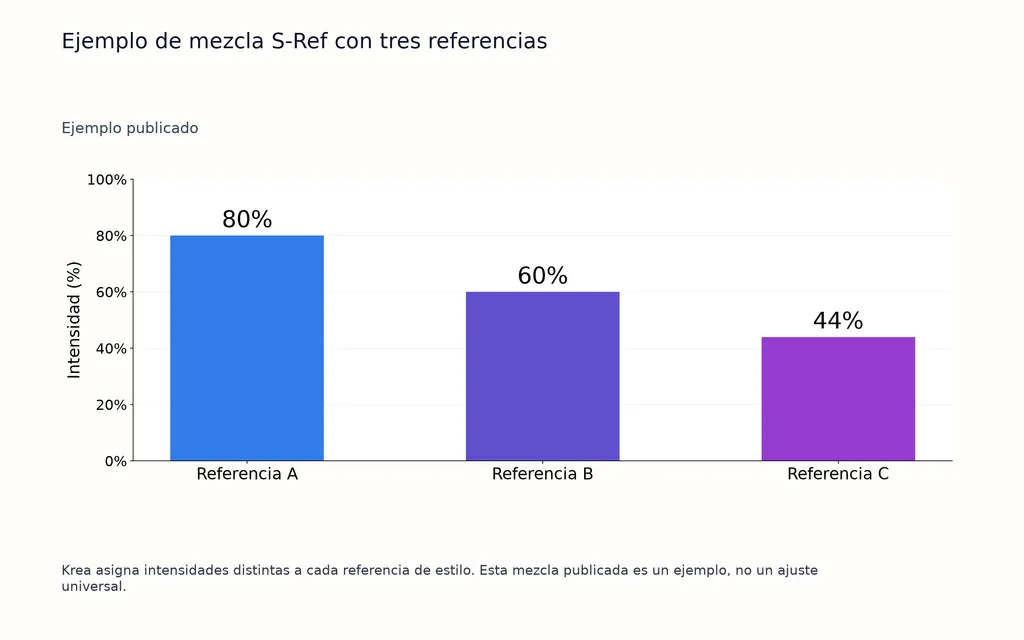
El flujo estándar Style Reference de Krea admite hasta cuatro S-Refs, cada uno con control de intensidad propio.
Krea muestra combinaciones como 70% + 50%, 75% + 57% y 80% + 60% + 44%. La lección no es copiar cifras, sino asignar una responsabilidad visual a cada referencia.
Por ejemplo:
- La referencia A controla paleta y material.
- La referencia B controla luz o tratamiento fotográfico.
- La referencia C controla textura o lenguaje ilustrativo.
No lleves todos los S-Refs al máximo a la vez. Cuando varias referencias compiten con fuerza, cuesta diagnosticar cuál causó un cambio no deseado de material, composición o contenido.
Moodboard y S-Ref de Krea 2
Un Moodboard no es solo una pila mayor de S-Refs.
Krea afirma que Moodboards analiza colecciones mayores mediante transferencia de estilo, LLM personalizados y agrupación. El sistema razona sobre conceptos, personajes recurrentes, expresiones, composiciones, atmósfera y tono general, y produce Taste Profile (perfil estético), Keywords (palabras clave) y Avoids (elementos a evitar).
S-Ref | Panel de inspiración (Moodboard) |
|---|---|
Transferencia precisa de estilo | Universo estético más amplio |
Hasta cuatro referencias | Colección de imágenes mayor |
Intensidad por referencia | Interpretación del conjunto |
Ideal para un aspecto concreto | Ideal para dirección artística sostenida |
No bloquea la identidad | No bloquea la identidad |
Usa S-Refs para un tratamiento concreto de campaña. Para un universo de marca duradero, Moodboards es la herramienta más potente a nivel de sistema.
¿Cómo mejoran los controles generativos el control creativo de Krea 2?
Los controles generativos permiten cambiar el comportamiento visual manteniendo el prompt. Krea ofrece actualmente Intensity (intensidad), Complexity (complejidad), Movement (movimiento) y Creativity (creatividad).
Intensity intensifica o suaviza la estilización. Complexity controla la densidad visual. Movement afecta la energía de cámara y pose. Creativity determina cuánto amplía Krea lo escrito.
En Creativity, Raw no amplía el prompt, Low se mantiene más cerca, Medium ofrece una interpretación equilibrada y High da más libertad sobre estilo, tono y estética.
Este ajuste Raw de Creativity no debe confundirse con Krea 2 Raw, el checkpoint separado sin destilar que se explica a continuación.
Krea 2 Medium, Large, Raw y Turbo: ¿cuál usar?
Krea 2 Medium y Large
Krea presenta Medium como la opción predeterminada más rápida, barata y con mayor posentrenamiento, estable en muchas tareas. Large supera el doble de su tamaño, tiene un posentrenamiento más suave y un carácter más crudo, texturizado y flexible, especialmente fuerte en fotorrealismo y estilos experimentales.
Por eso «Medium para arte, Large para fotografía» es demasiado simple. Medium es una buena opción predeterminada; Large tiene más sentido si valoras especialmente textura, fotorrealismo, desenfoque de movimiento, grano o mayor amplitud expresiva.
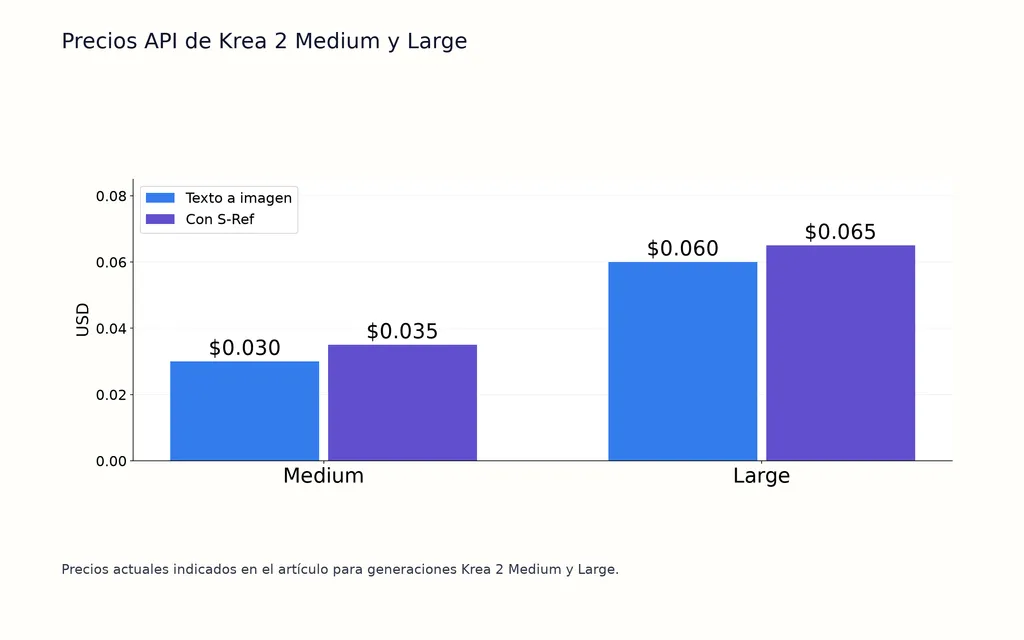
La tarifa actual de la API Krea indica para Medium $0.030 por generación texto a imagen y $0.035 con S-Refs, frente a $0.060 y $0.065 para Large.
Krea 2 Raw y Turbo
Krea 2 Raw pertenece a otro contexto de familia de modelos. Krea describe Raw como el checkpoint base sin destilar para ajuste fino y entrenamiento LoRA, mientras Turbo es un checkpoint destilado de 8 pasos para inferencia rápida. Recomienda entrenar en Raw y ejecutar el LoRA resultante en Turbo.
La experiencia alojada de Turbo en Krea puede generar en unos dos segundos, ideal para ciclos creativos rápidos.
En nuestra revisión, una comparación local de 80 imágenes usó Turbo a 8 pasos y unos 7 segundos por imagen, mientras Raw con Turbo-LoRA usó 16 pasos y unos 22 segundos. La opción rápida repitió más composiciones centradas; la basada en Raw dio más diversidad de semillas y composiciones. Es un caso de flujo, no un benchmark universal.
¿Cómo funciona Krea 2 Identity Edit?
Krea 2 Identity Edit es una extensión comunitaria
El flujo Identity Edit v1.2 descrito aquí no es una función oficial de Krea.ai. Es un ajuste fino comunitario sobre Krea 2 Raw para edición condicionada por referencias.
Su función difiere de S-Ref: cambiar ropa, pose, expresión, accesorios o contexto intentando preservar a la persona o sujeto.
El mejor patrón de prompt es breve y centrado en el estado final. Describe lo que debe contener la imagen terminada, no la operación de edición. Los cambios complejos son más fiables encadenados:
Original → Ropa → Pose → Expresión → Accesorio
Ajustes clave de Identity Edit
La documentación recomienda para la mayoría de ediciones Turbo a 8–12 pasos con CFG 1.0. Reference Boost cerca de 4 es un punto inicial de gran parecido; por debajo de 1 da más libertad y por encima de 10 puede perjudicar las eliminaciones. Unos 8 pasos favorecen la composición; 12, el detalle facial.
Para grandes eliminaciones, el punto inicial documentado es Raw a unos 20 pasos y CFG 3.0. El autor recomienda generar como máximo a unos 2MP para reducir duplicaciones y filtraciones de la fuente. En ediciones con dos entradas, el orden es fijo: escena primero, persona después.
¿Cuáles son los límites reales de la edición de identidad de Krea 2?
La preservación de identidad debe tratarse como un objetivo de diseño, no una garantía.
Los fallos recurrentes de la documentación y las preguntas de usuarios incluyen deriva facial, detalles de ropa inventados, cambios no locales de luz o color, cambios de piel, convergencia de identidades en escenas grupales y dependencia de semillas. Cambiar ropa suele ser menos predecible que un cambio simple centrado en el rostro.
Un flujo ComfyUI revisado funcionaba en una RTX 3060 con 6GB de VRAM y 16GB de RAM, con muestreo en dos etapas y ampliación 2×. Era técnicamente viable, pero la edición de ropa seguía siendo irregular. Viabilidad del hardware y fiabilidad en producción son cuestiones distintas.
En e-commerce, personajes recurrentes o publicidad, cada resultado sensible a la identidad debe compararse con la fuente antes de aprobarse.
¿Sigues necesitando un LoRA de Krea 2 para consistencia de personajes?
Para ediciones ocasionales, Identity Edit puede bastar. Para un personaje que reaparece en decenas de escenas, ángulos y recursos, Character LoRA aporta un conocimiento previo de identidad aprendido en vez de inferirla repetidamente desde una referencia.
El entrenamiento oficial de Krea requiere al menos tres imágenes, usa descripciones y admite estilos, personajes, objetos y materiales. Krea recomienda Medium como inicio más rápido y Large si se necesita un LoRA más potente.
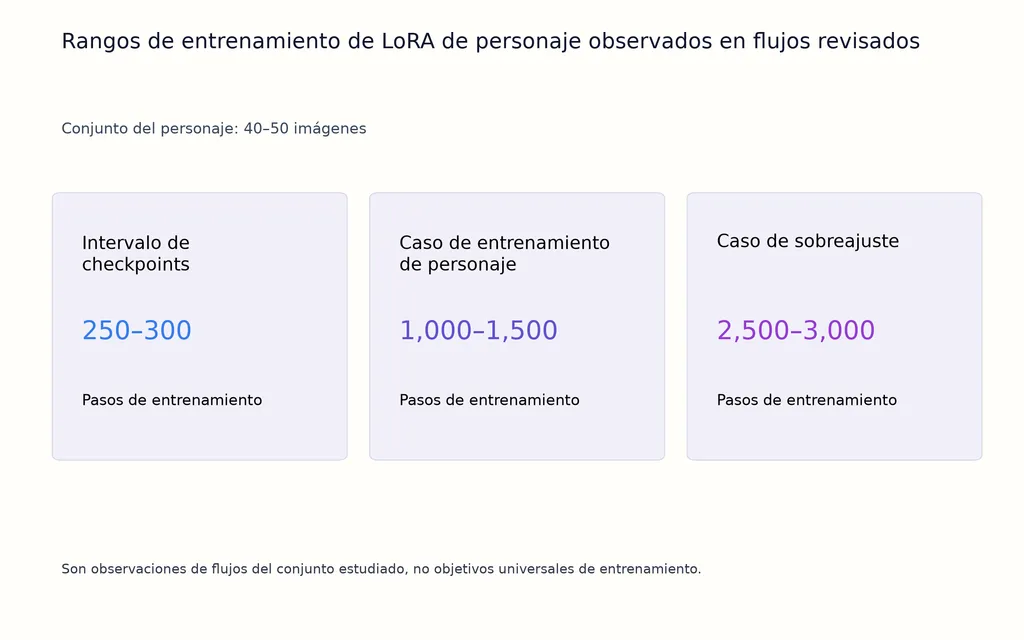
En un flujo de personaje de nuestra investigación, 40–50 imágenes y unos 1.000–1.500 pasos lograron un parecido percibido fuerte con 16GB de VRAM; era subjetivo, no un benchmark. Otro caso de LoRA de estilo empezó a sobreajustarse hacia 2.500–3.000 pasos, por lo que guardar checkpoints cada 250–300 pasos ayudaba a elegir un modelo anterior más limpio.
Para vídeo, un flujo relacionado creó 16 variaciones de pose y cámara desde un personaje inicial antes de enviar vistas seleccionadas a generación de vídeo. Ese banco de referencias aporta más estructura que una sola imagen frontal. Un principio similar aparece en la guía de referencias MiniMax H3.
¿Qué flujo de Krea 2 es mejor para cada objetivo de diseño?
Objetivo | Mejor método inicial | Riesgo principal |
|---|---|---|
Ideación rápida | Prompt corto + Turbo | Composición repetitiva |
Coincidencia precisa de estilo | S-Ref | Filtración de estilo |
Estética híbrida | Varios S-Refs | Señales visuales en conflicto |
Universo estético duradero | Panel de inspiración (Moodboard) | No bloquea la identidad |
Exploración controlada | Controles generativos (Generative Sliders) | Interpretación excesiva |
Generación amplia y estable | Medium | Menor flexibilidad en bruto |
Trabajo editorial crudo o fotorrealista | Large | Mayor coste |
Cambio de ropa o pose | Identity Edit | Deriva de identidad |
Personaje recurrente | LoRA de personaje | Complejidad de entrenamiento |
Flujo de personaje a vídeo | LoRA o identidad + banco de variantes | Inconsistencia entre vistas |
En producción de diseño profesional, la mejor secuencia es Explorar → Refinar → Fijar estilo → Construir el sistema estético → Controlar identidad o estructura → Editar una variable cada vez → Crear variantes → Finalizar.
Preguntas frecuentes
¿Qué intensidad de S-Ref usar en Krea 2?
Empieza cerca del 50% para equilibrar prompt y referencia. El 20% mantiene el dominio del prompt; el 80% da mucho más control a la referencia. Más intensidad puede mejorar la fidelidad de estilo, pero también filtrar colores, composición o detalles del sujeto de referencia.
¿Es oficial Krea 2 Identity Edit y por qué aún puede variar la identidad?
No. Identity Edit v1.2 es un LoRA comunitario basado en Krea 2 Raw. La identidad puede variar porque la edición regenera más que una región local perfectamente aislada. Geometría facial, ropa, piel, luz y detalles ajenos pueden cambiar, sobre todo al pedir varias transformaciones a la vez.
¿Raw o Turbo: qué modelo de Krea 2 usar?
Usa Turbo para inferencia e iteración rápidas. Usa Krea 2 Raw para ajuste fino, entrenamiento LoRA y flujos avanzados de modelo base. No confundas Raw con Creativity Raw, que solo desactiva la expansión del prompt dentro del control creativo de Krea.
¿Necesito un LoRA para consistencia de personajes en Krea 2?
No para cada edición. Para pocos cambios en una imagen existente, un flujo de identidad puede bastar. Si el personaje se repite en muchas poses, escenas, ángulos o recursos de vídeo, Character LoRA es más apropiado porque aprende la identidad en un conjunto de datos en vez de inferirla repetidamente desde una referencia.
Conclusión
Krea 2 resulta mucho más controlable cuando estilos, referencias e identidad se tratan como capas de diseño separadas, no como problemas para un prompt perfecto. Los prompts definen el contenido, S-Refs transfiere un lenguaje visual preciso, los Moodboards establecen un universo estético, los controles generativos guían la exploración y LoRA o los flujos de identidad gestionan sujetos recurrentes. Lo más fiable no es una generación única, sino exploración, fijación de estilo, control de identidad o estructura, edición por etapas, creación de variantes y producción final.
Más del blog de Virse
Flujo de trabajo
FLUX 3 Image Prompt Guide: 12 Prompts & Editing Fixes
22 de octubre de 2026 by Vincent
Flujo de trabajo
How to Use FLUX 3 Image: Edit Photos Without Unwanted Changes
21 de octubre de 2026 by Vincent
Flujo de trabajo
Wan 3.0 Prompt Guide: Fix Wrong Motion, Character Drift, and Ignored Instructions
20 de octubre de 2026 by Yifan Zhao