MiniMax H3 Storyboard-to-Video: How to Get Multi-Shot Consistency Without OOM

Vincent10분 읽기 ·

MiniMax H3 Storyboard-to-Video: How to Get Multi-Shot Consistency Without OOM

The best way to get multi-shot consistency with MiniMax H3 Storyboard-to-Video without running into unnecessary OOM issues is to combine a storyboard with clear reference roles, continuity-based shot grouping, and lower-resolution testing before final renders. Use Ref2VA when identity, environment, motion, or audio need separate references, and FL2VA when two storyboard frames should define a controlled start-to-end transition.

The problem is that more shots and more references do not automatically create better consistency. Character identity, backgrounds, products, lighting, and voice can drift when connected shots are generated separately, while long reference videos, higher resolutions, and overloaded Ref2VA workflows can increase VRAM pressure and OOM failures. The key is deciding what each reference controls, which shots must stay together, and what can be regenerated independently.

A practical workflow is Storyboard → Reference Roles → Continuity Grouping → Low-Resolution Test → Selective Regeneration → Final Render. With Virse’s infinite canvas, teams can organize storyboards, references, assets, and generation tasks in one workspace, making H3 multi-shot production more visual, consistent, and repeatable. MiniMax H3, Seedance 2.5 and Seedance 2.0, are now available on Virse, so teams can explore and compare multiple leading video models in the same creative workflow.

virse workforce

How Does MiniMax H3 Storyboard-to-Video Work?

H3 works best when the storyboard becomes the visual specification of the sequence while other inputs control information a static frame cannot fully communicate.

Can H3 Read a Complete Multi-Panel Storyboard?

Our research includes a workflow in which a complete storyboard representing roughly 15 seconds of video was supplied as one visual reference rather than being split into individual keyframes. The resulting sequence followed multiple compositions from that storyboard closely enough to make the whole-board approach practical for rapid prototyping.

The effective workflow was:

Idea → Storyboard → Whole Storyboard Reference → H3 → Review

This matters because the designer no longer has to describe every composition in text.

There are still limits to what can be claimed. Our review did not find a verified universal maximum for storyboard panels, guaranteed panel-order accuracy, or reliable reading of small storyboard text. Complex boards should therefore be tested rather than assumed to behave like simple 10–15 second sequences.

Why Storyboards Reduce H3 Prompt Complexity

A storyboard can communicate information that would otherwise make the prompt unnecessarily long:

  • composition
  • framing
  • subject position
  • product placement
  • shot relationships
  • visual progression

The text instruction can then focus on motion, camera behavior, timing, dialogue, audio, and intentional changes.

That division is important. In professional workflows, visual direction is usually easier to review and correct on a canvas than inside a paragraph of prompt text.

H3 FL2VA vs Ref2VA: Which Mode Is Better for Storyboards?

Choosing the correct H3 mode changes how much control the storyboard can provide.

Use FL2VA for Strong Start-to-End Transitions

FL2VA is built around a first frame and a last frame. It is most useful when two visual states define a continuous transition, such as:

  • pose changes
  • product transformations
  • camera movement
  • character motion
  • animation between two storyboard panels

MiniMax guidance favors a continuous motion path in this mode, which makes FL2VA especially suitable for single-shot transitions or panel-to-panel chaining.

A storyboard can therefore be converted into several short segments by using consecutive panels as start and end anchors, then assembling those segments afterward.

Use Ref2VA for Multi-Reference Storyboard Workflows

Ref2VA is better when the video depends on multiple reference types.

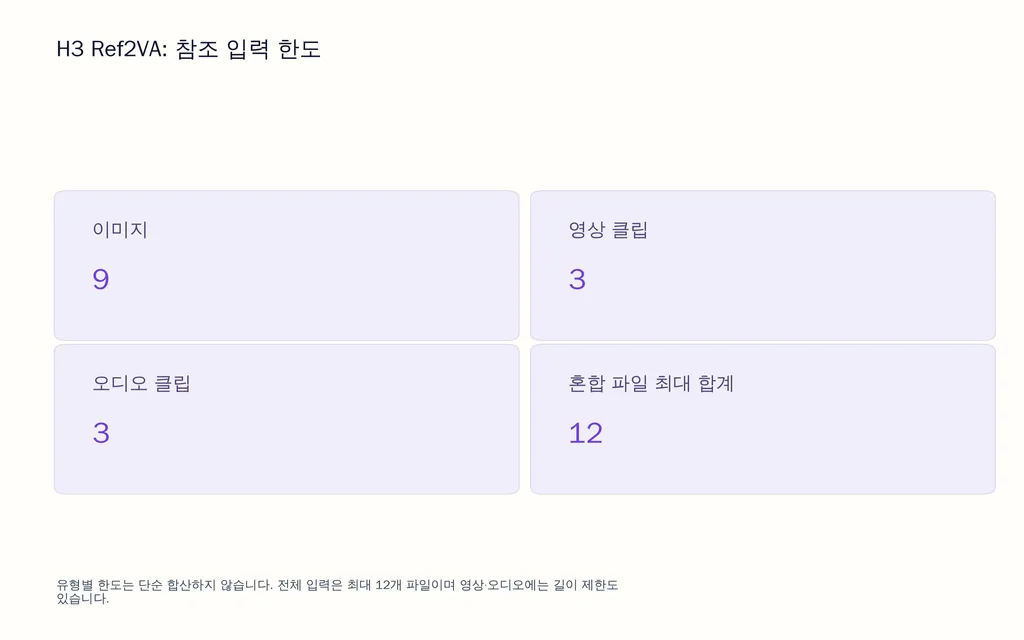
MiniMax's published specifications support up to 9 images, 3 video references, and 3 audio references, with a maximum of 12 mixed input files. Reference video and audio also have duration constraints, so using every available slot is rarely the best strategy.

Radar chart showing H3 Ref2VA input limits: up to 9 images, 3 video references, 3 audio references, and a maximum of 12 mixed input files.

Ref2VA is more appropriate when one sequence needs:

  • a storyboard
  • a character reference
  • a product reference
  • an environment reference
  • a motion reference
  • an audio reference

H3's multimodal context system is designed to reason across these different inputs, but clear role assignment remains essential.

How Should H3 Ref2VA References Be Structured?

The strongest pattern in our research is simple:

One reference should have one primary responsibility.

Reference

Primary Job

Storyboard

Composition and shot sequence

Character image

Identity and clothing

Product image

Shape and appearance

Environment image

Location and lighting

Reference video

Motion or camera behavior

Audio reference

Voice, timing, rhythm

Why Clear Reference Roles Matter

Imagine a storyboard with the correct composition but an inaccurate product shape. If a clean product image is available, that image should remain the source of truth for product identity while the storyboard controls framing.

This is more reliable than expecting one reference to define everything.

Why More References Are Not Always Better

Our review of real H3 questions repeatedly surfaced two problems with reference overload.

First, references can conflict. A character may wear different clothing across sources, or two environment images may imply different lighting.

Second, reference video can increase memory pressure significantly.

The better question is not how many references H3 supports, but what each reference needs to control.

What Is the Best H3 Storyboard-to-Video Workflow?

A production workflow should validate creative direction before spending compute on final quality.

Step 1: Build the Storyboard Around the Final Duration

For a 10–15 second sequence, focus on meaningful visual states:

  • opening composition
  • main action
  • transition
  • reveal
  • ending state

More panels do not automatically create a better result.

Step 2: Audit the Storyboard Before Generation

One workflow in our research showed very strong storyboard adherence, but the storyboard contained incorrect scale, color, and object details. Those errors carried into the video.

The practical rule is:

Better adherence makes input quality more important.

Check proportions, colors, character placement, product geometry, aspect ratio, and panel logic before generation.

Step 3: Assign Reference Roles and Shot Intent

Decide what must stay stable.

For example:

Character reference → identity

Storyboard → composition

Environment reference → location

Motion reference → movement

Audio reference → voice

The prompt should only fill the information the references do not provide.

Step 4: Describe the Timeline

Static panels show states, not timing.

For each shot, define current state, action, camera behavior, transition, and end state. This gives H3 the temporal structure needed to connect storyboard panels coherently.

Step 5: Explore at Lower Resolution First

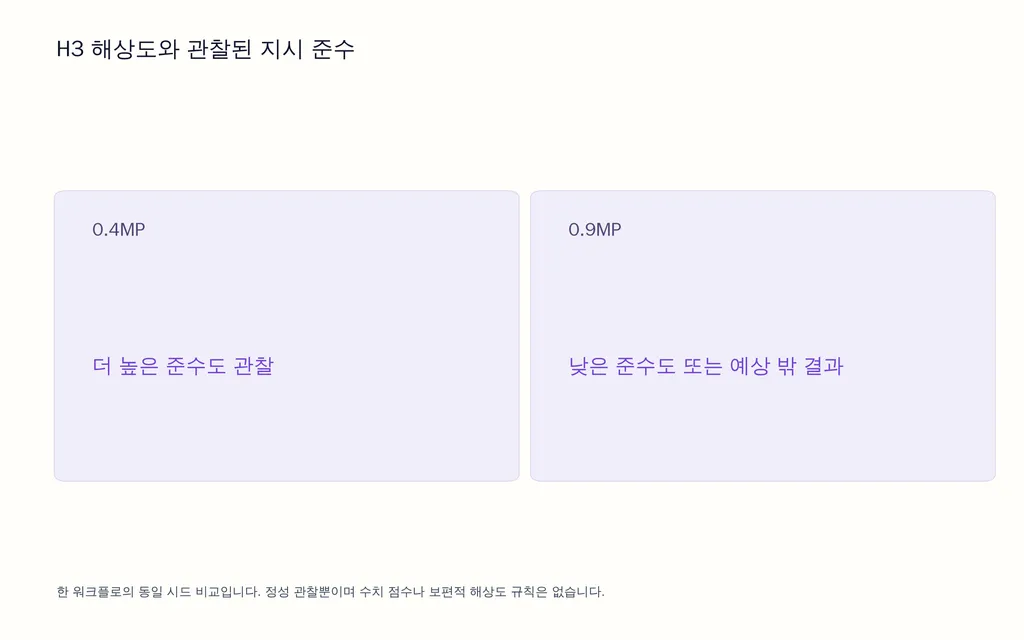
Our research included a same-seed comparison where approximately 0.4MP produced stronger adherence than 0.9MP.

This is not a universal benchmark, but it supports a useful production principle:

solve direction before fidelity.

Test composition and movement at lower resolution, then refine the strongest result.

Two-point comparison of the same-seed H3 test at 0.4MP and 0.9MP: stronger adherence was observed at 0.4MP, while the 0.9MP result showed weaker or unexpected adherence. No quantitative adherence score was reported.

H3 Multi-Shot vs Shot-by-Shot: Which Is Better?

There is no single best answer. The choice is a trade-off between continuity and retry efficiency.

Shots benefit from staying together when they share:

  • the same character
  • the same environment
  • continuous action
  • continuous dialogue
  • synchronized audio

This reduces the amount of continuity the model must reconstruct between separate generations.

Generate Independent Shots Separately for Faster Iteration

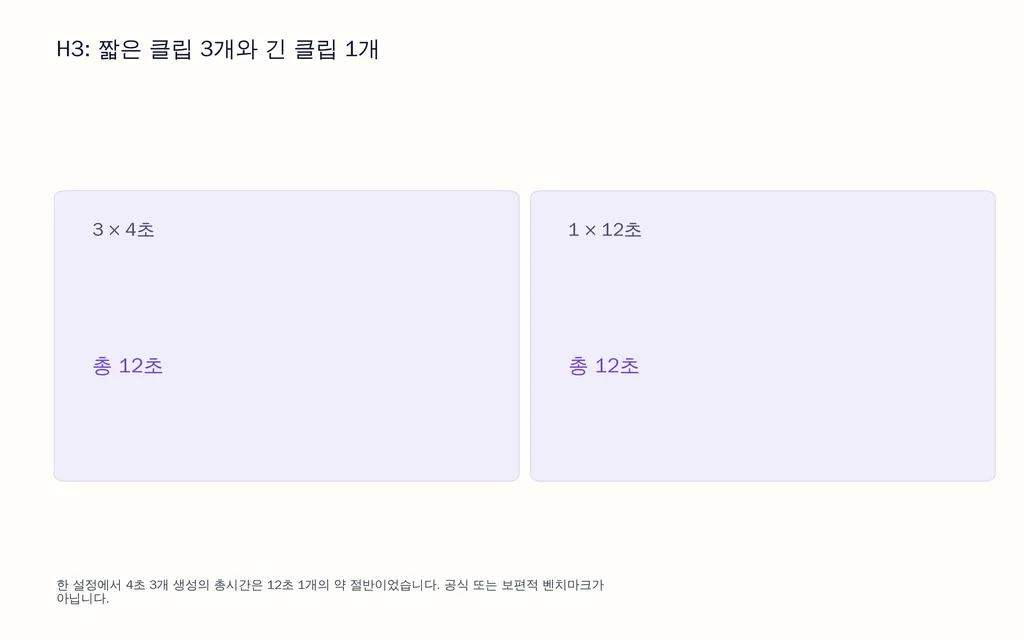
One workflow in our research compared three 4-second clips with one 12-second clip. In that specific setup, the three shorter generations took roughly half the total generation time.

That is not an official benchmark, but it demonstrates why long sequences can become expensive to retry.

Comparison of three 4-second H3 clips and one 12-second clip. Both approaches create 12 seconds of video, while the reviewed workflow found that the three shorter generations took roughly half the total generation time.

Use a Continuity Score to Group Storyboard Panels

A practical way to decide is to score each transition based on:

  • same character
  • same scene
  • continuous action
  • continuous dialogue
  • shared audio
  • direct temporal relationship

High continuity score: keep the shots together.

Low continuity score: separate them.

This hybrid method is usually more practical than forcing every storyboard into either one long generation or completely isolated clips.

What Do Real H3 VRAM Tests Show?

H3 performance cannot be reduced to one minimum VRAM number.

6GB VRAM: Possible but Slow

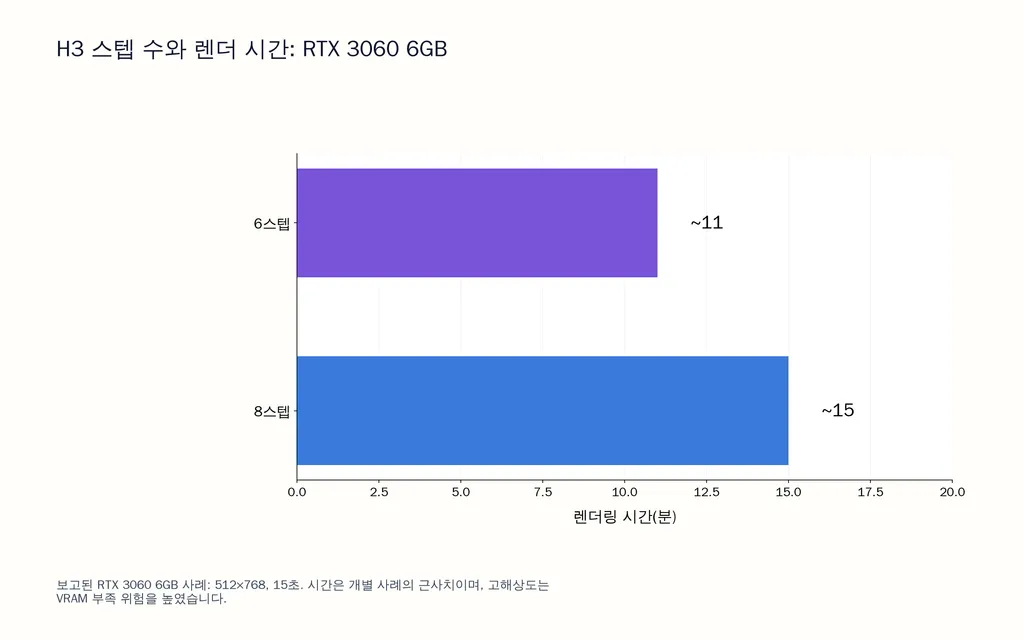
One RTX 3060 6GB workflow generated:

  • 512 × 768
  • 15 seconds
  • about 11 minutes at 6 steps
  • about 15 minutes at 8 steps

Higher-resolution attempts caused OOM errors in that setup.

Bar chart comparing H3 generation time on an RTX 3060 6GB workflow: about 11 minutes at 6 steps and 15 minutes at 8 steps for a 512 × 768, 15-second video.

12GB VRAM: Reference Duration Matters

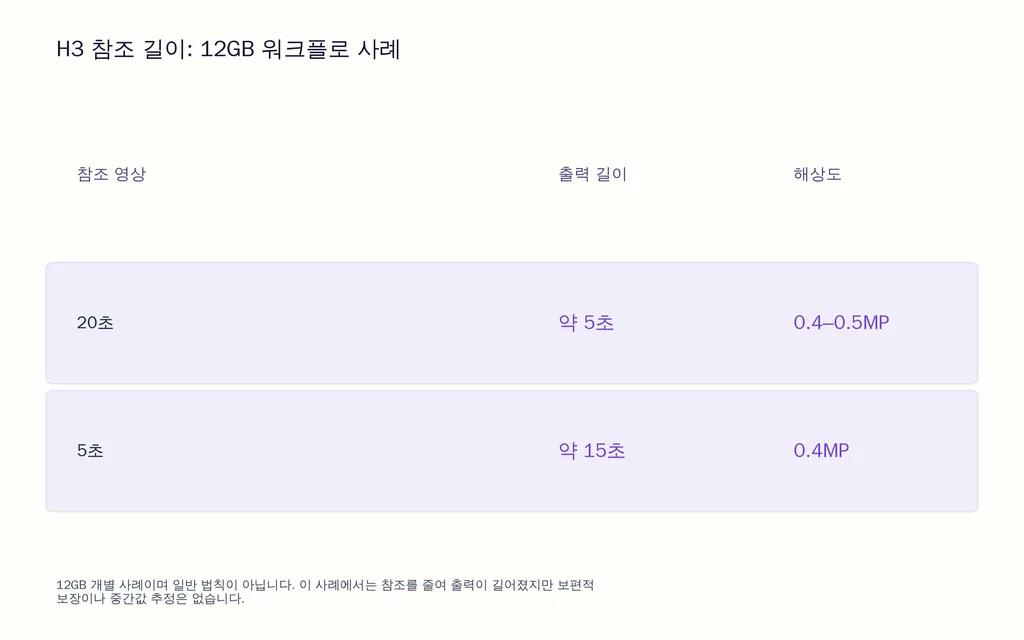
A 12GB workflow initially used a 20-second reference video and could generate only around 5 seconds at 0.4–0.5MP.

After trimming the reference to 5 seconds, the same workflow produced roughly 15 seconds at 0.4MP.

The lesson is clear: longer references are not automatically better references.

Two-point line chart from a reviewed 12GB H3 workflow: a 5-second reference produced about 15 seconds of output at 0.4MP, while a 20-second reference produced about 5 seconds at 0.4–0.5MP.

16GB VRAM: OOM Can Be a Workflow Problem

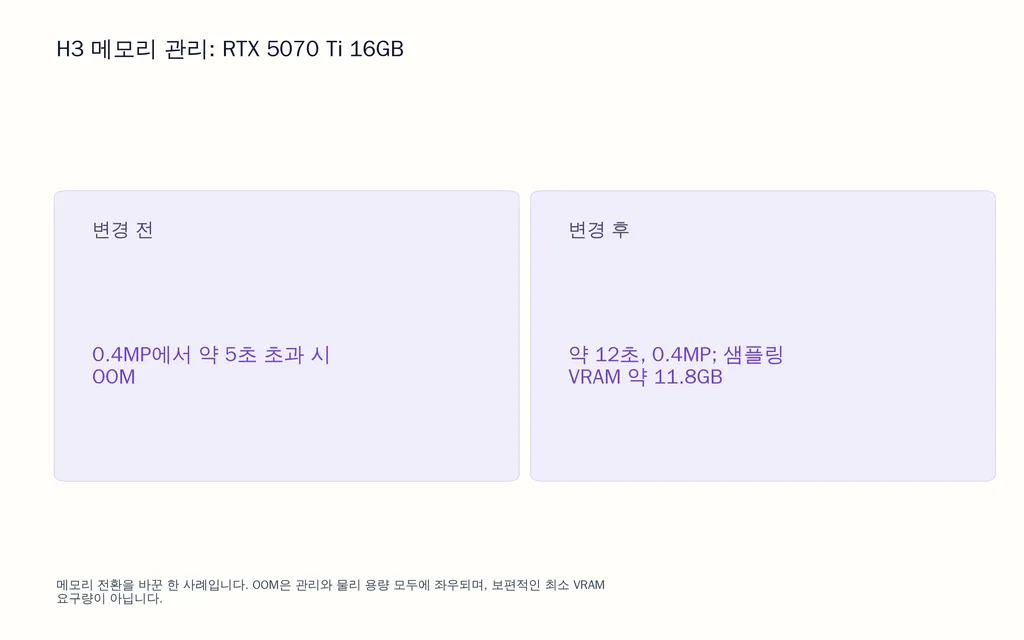
An RTX 5070 Ti 16GB setup initially hit OOM above roughly five seconds at 0.4MP.

After changing the memory-switching workflow, it reached around 12 seconds at 0.4MP, with sampling VRAM reported at about 11.8GB.

This shows that OOM can depend on memory management, not only physical capacity.

Before-and-after comparison for an RTX 5070 Ti 16GB H3 workflow: OOM occurred above roughly 5 seconds at 0.4MP before the memory-switching change; afterward, the workflow generated about 12 seconds at 0.4MP with approximately 11.8GB sampling VRAM.

How Do You Improve H3 Character, Scene, and Voice Consistency?

Continuity is broader than face consistency.

Character References Do Not Solve Scene Drift

A character image can stabilize identity, but separate generations may still change:

  • background architecture
  • lighting
  • object positions
  • secondary characters
  • spatial relationships

For repeated locations, dedicated environment references are often as important as character references.

Voice Can Drift Across Separate Generations

One workflow in our research generated a sequence in approximately 12-second and 10-second segments. Visual identity remained usable, but the character voice changed between generations.

Audio references can provide an additional anchor, but no available evidence supports claiming perfect voice continuity.

For dialogue-heavy sequences, keep connected dialogue shots together whenever practical.

Why H3 Still Needs a Storyboard Compiler

The missing layer in storyboard-to-video is not another prompt generator. It is a storyboard compiler.

A more advanced production system would convert a storyboard into:

Panel Detection → Shot Understanding → Reference Assignment → Continuity Scoring → Shot Grouping → Generation Planning → Selective Regeneration

This is not an official H3 feature. It is a workflow framework derived from our research.

Its value is significant because designers should not have to manually decide every time which panels belong together, which reference controls each visual property, and which failed section should be regenerated.

That is also where canvas-based creative systems such as Virse become relevant: the opportunity is not only better generation, but better orchestration of the entire creative process.

FAQs

Can H3 Read a Whole Storyboard?

Yes. Our research includes a successful case using one multi-panel storyboard for an approximately 15-second sequence. However, panel count, complexity, and small text should still be tested rather than treated as universally reliable.

Should I Split H3 Storyboard Panels?

Not always. Use a whole storyboard for fast short-sequence exploration, FL2VA-style chaining when panels should act as strong start and end anchors, and separate generation when individual shots need frequent revision.

How Much VRAM Does H3 Need?

Our reviewed workflows include 6GB, 12GB, and 16GB setups, but performance varies substantially. Resolution, reference duration, output length, steps, and memory management can matter as much as raw VRAM capacity.

Why Does H3 Lose Character, Scene, or Voice Consistency?

Consistency becomes harder when related shots are split across generations. Character, environment, and audio references can help, but the most reliable workflow is to keep highly continuity-dependent shots in the same generation group whenever possible.

Conclusion

MiniMax H3 Storyboard-to-Video is most effective as a structured production workflow, not a one-click animation feature. The storyboard should control visual structure, FL2VA should handle strong start-to-end transitions, Ref2VA should combine clearly assigned multimodal references, related shots should be grouped according to continuity, and low-resolution exploration should happen before refinement. The most practical workflow is Storyboard → Reference Roles → Timeline → Continuity Score → Shot Groups → Controlled Generation → Selective Retry → Refinement. This approach reduces prompt complexity while giving designers a clearer, more repeatable way to direct multi-shot AI video.

Virse 블로그의 다른 글