Product Photography Lighting Setups
Vincent11 min read ·
Product photography lighting setups use controlled light sources, diffusion, reflectors, and shadows to reveal a product's shape, texture, and details. Start with one diffused light and a reflector for everyday products, use separate background lighting for white ecommerce images, and control reflected surroundings when photographing watches, jewelry, and glossy packaging.
Even with a good camera and softbox, product photos can suffer from harsh glare, gray backgrounds, and flat-looking surfaces. These problems become more frustrating when shooting reflective products or maintaining consistent lighting across an ecommerce catalog. Adding more lights does not automatically solve them; the key is understanding how light interacts with each material.
Once you have captured your product, Virse gives you an AI-powered creative canvas to take its visuals further. Explore multiple AI models in one workspace, experiment with backgrounds and compositions, and refine visual directions using reference images. Instead of settling for one product presentation, you can explore different creative concepts for your brand.
How Do You Set Up Product Photography Lighting at Home?
A basic home product photography lighting setup requires one controllable light, diffusion, a reflector, and a neutral background. The goal is to illuminate the product while maintaining enough contrast to reveal its shape.
1. One-Light Product Photography Setup
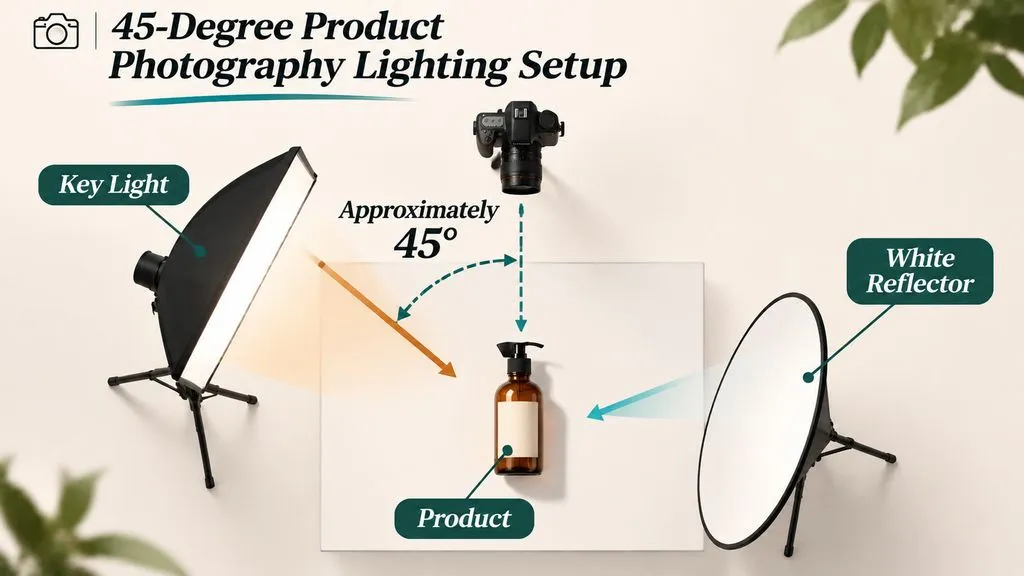
Position a diffused key light approximately 45 degrees to one side of the product. Place a white reflector opposite the light to fill the shadows. This angle is a starting point, not a universal rule.
Follow this workflow:
- Place the product against a neutral background.
- Position the softbox slightly above and to one side.
- Introduce a white reflector on the opposite side.
- Adjust the reflector until labels and shadow details are visible.
- Inspect product edges, highlights, and texture.
- Change the light position if the image looks flat.
Case Study: Godox MS300 Beginner Setup
A documented beginner configuration used a Godox MS300, softbox, and white reflector. Despite having basic studio equipment, the product lacked separation from the background, and parts of its label appeared too dark.
The important lesson is that brightness alone does not create dimensionality. Adjusting the key-light direction or reflector position may be more useful than immediately purchasing another light.
2. Two-Light Product Photography Setup
A two-light setup provides independent control over the key light and fill light.
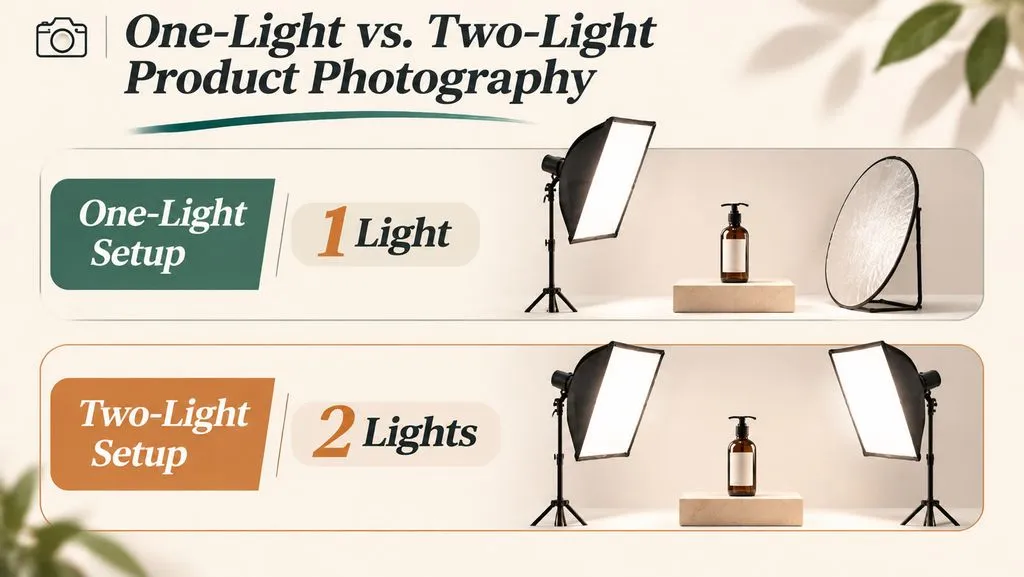
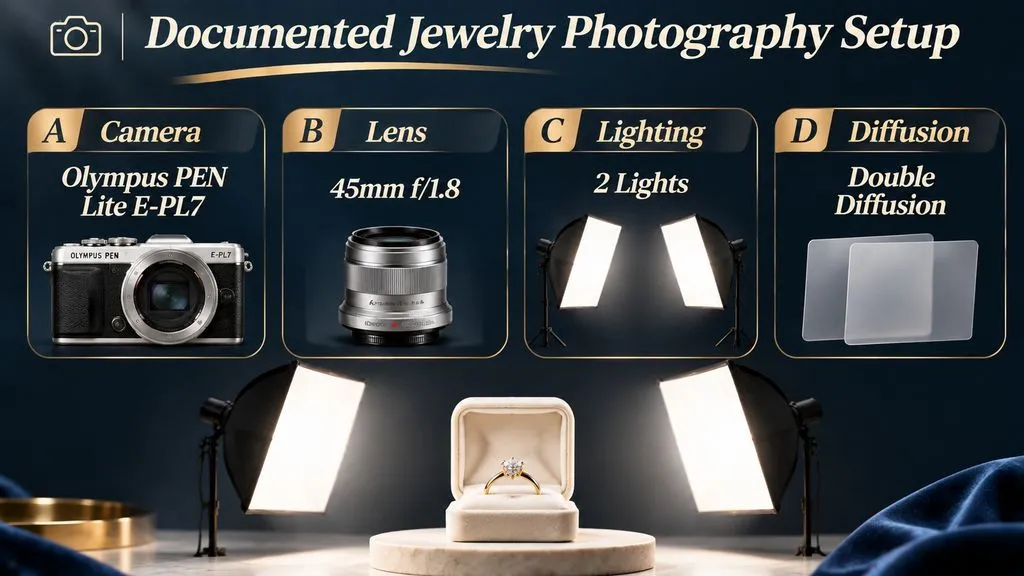
One documented jewelry arrangement used an Olympus PEN Lite E-PL7, a 45mm f/1.8 lens, and two lights positioned at approximately 45 degrees on opposite sides, with double diffusion.
The photographer reported being satisfied with the original image, with little apparent improvement from subsequent editing.
This example illustrates that equipment does not need to be expensive to produce satisfactory jewelry photographs. However, two equally strong lights can remove too much contrast.
Start with a dominant key light and adjust fill according to the product's reflective properties. Use a second light when a reflector cannot provide the independent illumination you need.
Which Product Photography Lighting Setup Works Best for Different Products?
The best product photography lighting setup depends on surface material, reflectivity, shape, and intended visual style.
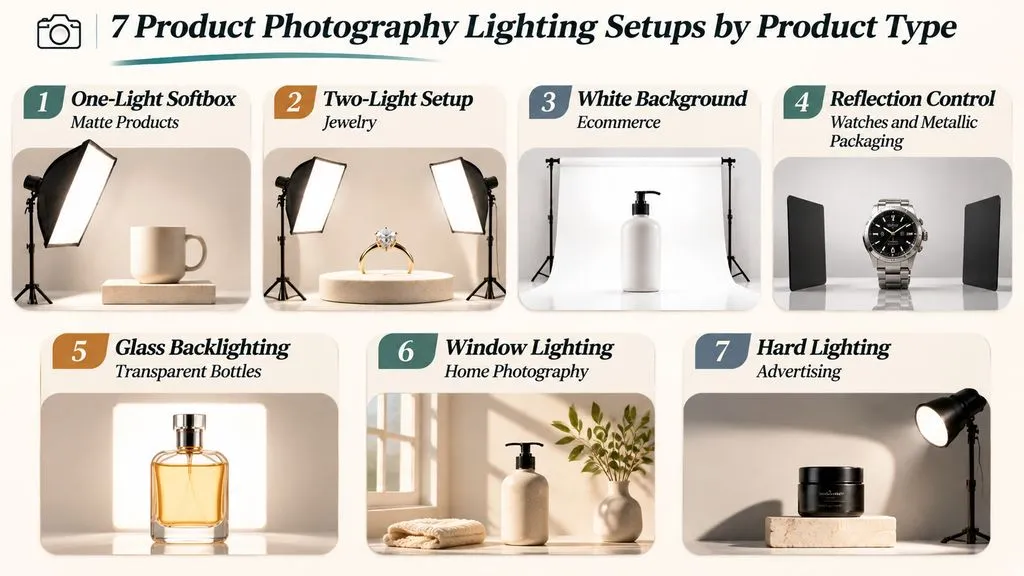
Setup | Best For | Main Technique |
One-light softbox | Matte products and packaging | Diffused key light and reflector |
Two-light setup | Jewelry and accessories | Key light and adjustable fill |
White-background setup | Ecommerce products | Separate subject and background lighting |
Reflective-product setup | Watches and metallic packaging | Diffusion panels and black cards |
Glass backlighting | Transparent bottles | Rear or side illumination |
Window lighting | Home product photography | Indirect daylight and reflector |
Dramatic hard lighting | Advertising images | Directional light and controlled shadows |
3. White-Background Product Photography Lighting
White-background photography requires separate attention to subject illumination and background brightness.
Case Study: Swimming-Pool Tile Catalog Photography
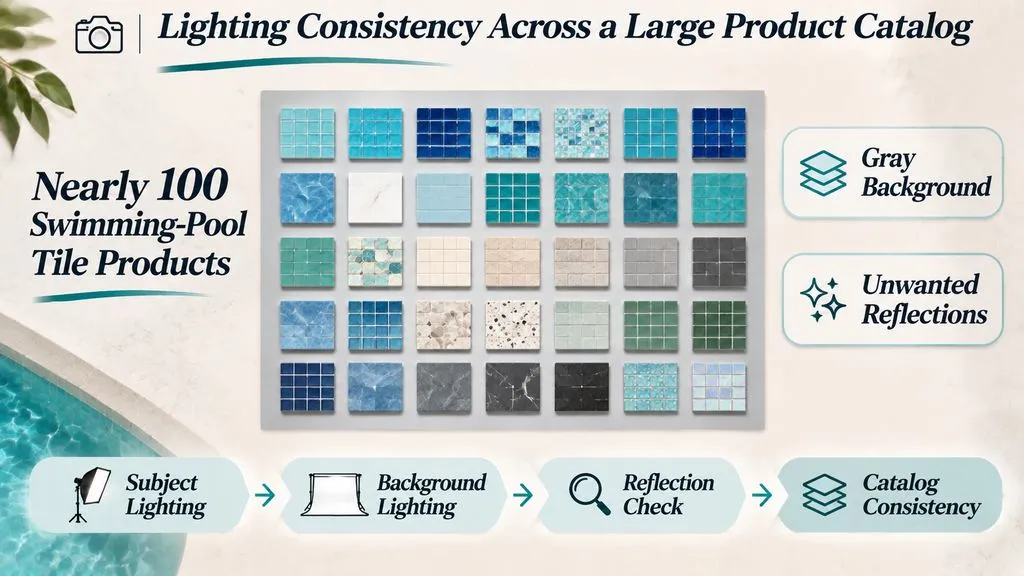
A documented catalog photography project involved nearly 100 swimming-pool tile products. The photographer encountered two connected problems: the white background appeared gray, while increasing brightness introduced unwanted reflections and highlights on the tiles.
A more controlled workflow is to:
- Position the product away from the backdrop where possible.
- Establish subject exposure with the key light.
- Adjust background illumination independently.
- Inspect reflective surfaces after each adjustment.
- Check product edges and colors before continuing the batch.
This case demonstrates why background brightness and subject exposure should be treated as separate variables. The research record does not contain verified before-and-after exposure or efficiency measurements.
4. Reflective Product Photography Lighting
Reflective product photography is fundamentally about controlling what the product reflects.
Use large diffusion surfaces to shape highlights and black cards to introduce controlled dark reflections. A softbox may soften illumination, but its shape can still appear on polished surfaces.
Case Study: Luxury Watch Ecommerce Photography
A documented luxury-watch photography case involved an online seller using a smartphone, lightbox, and ring light. The main problem was controlling reflections on watch dials and polished surfaces.
The seller was considering a dedicated camera, macro lens, and upgraded lighting equipment. However, the proposed upgrade had not yet produced documented performance results.
The practical lesson is to examine the reflected environment before replacing the camera.
Try these adjustments:
- Reposition the diffusion surface to change the shape of highlights.
- Change the camera angle to control reflections on the watch face.
- Introduce black cards to define polished edges.
- Remove unwanted objects from the reflected environment.
- Inspect the entire watch rather than concentrating only on the dial.
A more expensive camera cannot independently solve uncontrolled reflections.
Case Study: Gold Cosmetic Packaging
Another documented photography configuration involved a cylindrical diffusion enclosure made from translucent material, with an opening for the camera and lights positioned outside.
For cylindrical metallic packaging, this approach can create more continuous highlight bands instead of distracting bright spots.
The underlying principle is that curved reflective surfaces require controlled, continuous reflections. Polarization may help with certain nonmetallic reflections, but it is not a universal solution for reflective metal.
When developing visual concepts for cosmetic packaging, lighting should work alongside the package shape, surface finish, and graphic elements. You can also explore AI packaging design concepts to experiment with different packaging appearances and creative directions.
5. Glass Product Photography Backlighting
Transparent products need lighting that reveals their edges without washing out labels or liquid colors.
Position diffused illumination behind or slightly beside the bottle. Introduce black cards along the sides when additional edge contrast is necessary.
Inspect three elements separately:
- Transparent edges: Are the bottle's contours visible?
- Label readability: Is the printed information clear?
- Liquid color: Does the lighting preserve the intended appearance?
Strong backlighting can improve edge definition while reducing visible label detail. This setup is a practical material-based recommendation rather than a measured result from the documented cases.
6. Natural Window Lighting for Product Photography
For home product photography, indirect window light provides an accessible starting point.
Place the product beside a window and use a white reflector to brighten the opposite side. Avoid uncontrolled direct sunlight when soft illumination is the objective.
The main limitation is consistency. Daylight changes with weather and time, making controlled artificial lighting more practical for repeatable catalog production.
7. Dramatic Hard-Light Product Photography
Hard lighting creates defined shadows, strong highlights, and visual contrast.
Position a directional light to emphasize the product's shape, then introduce limited fill to preserve important details.
This approach works well for creative advertising images involving fragrance bottles, metallic accessories, and premium packaging.
Unlike ecommerce white-background photography, dramatic product photography does not need to eliminate every shadow. The goal is to use contrast intentionally.
Why Does Your Product Photography White Background Look Gray?
A white background can appear gray when its recorded brightness is insufficient relative to the camera exposure. Increasing overall exposure may brighten the backdrop but can also remove detail from reflective products.
Separate Background Lighting From Subject Exposure
The swimming-pool tile case demonstrates why these lighting objectives should be addressed independently.
Check whether the background or product is underexposed, adjust background illumination, and inspect reflective surfaces after each change.
For larger catalogs, test the setup on representative products before applying it to the entire collection.
Preserve Product Edges Against White Backgrounds
White products photographed against white backgrounds can lose their outlines.
Introduce directional side lighting or carefully controlled dark reflections to improve separation. For transparent objects, inspect the edges independently from the background.
A bright backdrop is not successful if customers cannot distinguish the product's shape or material.
How Do You Fix Glare, Harsh Shadows, and Flat Product Photos?
Product photography lighting problems are easier to solve when you identify the visible symptom before changing equipment.
Control Reflections Instead of Increasing Brightness
Watch and cosmetic packaging cases highlight the importance of controlling reflected surroundings.
Try enlarging the diffusion panel, changing the camera angle, introducing black cards, and removing unwanted objects from the reflected environment.
A softbox is useful, but it does not automatically eliminate glare.
Improve Shadows and Product Separation
The Godox MS300 case illustrates that adequate illumination does not guarantee dimensionality.
When a product looks flat, reduce excessive fill, adjust key-light direction, and inspect shadow transitions.
For dark labels, reposition the reflector or adjust local illumination without washing out the surrounding packaging.
Problem | Likely Cause | First Adjustment |
Gray background | Insufficient background illumination | Adjust background light |
Harsh metallic glare | Uncontrolled reflections | Change diffusion or angle |
Flat product appearance | Excessive fill | Reduce fill |
Dark product label | Insufficient local illumination | Reposition reflector |
Invisible glass edges | Insufficient edge contrast | Add side lighting or black cards |
Multiple hard shadows | Competing light directions | Reposition lights |
What Is the Best Budget Product Photography Lighting Setup?
For beginners, a single controllable light, softbox, reflector, and stable camera support provide a practical starting point.
Choose Equipment Based on Your Photography Problem
Equipment | Purpose | When to Use |
LED or strobe | Main illumination | Basic lighting |
Softbox | Diffuse light | Everyday products |
White reflector | Fill shadows | One-light setups |
Black cards | Control reflections | Watches and metallic products |
Second light | Independent illumination | Complex lighting |
Light tent | Surrounding diffusion | Small products |
Tripod | Maintain framing | Repeatable photography |
Our review of product photography questions highlights recurring uncertainty about one-light versus two-light arrangements and softboxes versus light tents.
There is no universal winner. A reflector may be sufficient for matte packaging, while reflective jewelry may require more sophisticated reflection control.
When Should You Buy a Second Light?
Purchase another light when you have identified an area that cannot be illuminated adequately with your existing equipment.
The luxury-watch case is a useful reminder that reflection control can remain the central challenge even when a photographer is considering substantial equipment upgrades.
Before purchasing, experiment with diffusion size, light placement, and black cards. These adjustments help establish whether additional equipment is actually necessary.
How Do You Keep Product Photography Lighting Consistent Across a Catalog?
Catalog photography requires repeatable lighting, consistent camera settings, and quality checks for different materials.
Create a Repeatable Product Photography Lighting Reference
Select a representative product and record:
- Key-light position and modifier
- Reflector and fill placement
- Background color and illumination
- Camera position and exposure
- White balance
- Product-specific reflection adjustments
For catalogs containing matte packaging, glossy bottles, and reflective metal, maintain separate reference arrangements where necessary.
The swimming-pool tile photography case illustrates the importance of repeatability when producing large product collections.
Reduce Retouching Through Better Lighting
A documented small-business packaging case described reflections and uneven highlights creating more editing work than expected.
The practical workflow is to address controllable problems during capture rather than depending entirely on post-production.
Before moving to the next product, inspect:
- Glare and unwanted reflections
- Label readability
- Background consistency
- Product color
- Edge visibility
For creative campaigns, Virse can help explore alternative backgrounds and compositions using product reference images. Generated visuals should still be checked against the original product for accurate packaging, typography, proportions, and colors.
Product Photography Lighting FAQ
Is one light enough for product photography?
Yes. One diffused key light and a reflector can illuminate many small and matte products effectively. Start with this arrangement and add a second light only when you need independent control over another area.
How do you photograph reflective products without glare?
Use large diffusion surfaces to shape reflections, adjust the camera or product angle, and introduce black cards to control reflective edges. For watches and metallic packaging, controlling the reflected environment is often more important than increasing light intensity.
Why does my white product photography background look gray?
The background may be receiving insufficient illumination relative to subject exposure. Adjust background lighting separately, then inspect the product for overexposed highlights and lost edges.
Can you take professional product photos with a phone?
Yes. A phone, stable support, controlled lighting, and a suitable background can produce useful ecommerce images. Dedicated cameras and macro lenses provide additional flexibility for demanding close-up photography, but equipment alone cannot replace proper lighting.
Conclusion
Effective product photography lighting begins with understanding the material and identifying the actual problem. The watch, jewelry, cosmetic packaging, and large catalog cases demonstrate why reflection control, background illumination, and repeatable lighting deserve more attention than simply purchasing additional equipment. Start with a controlled one-light arrangement, develop material-specific setups, and document successful configurations. Once accurate product photographs are captured, AI-assisted creative tools such as Virse can extend the workflow into alternative compositions and campaign concepts.