
White Background Product Photography: DIY vs AI — Which Is Better for Ecommerce?
 Yifan Zhao14 min read ·

White background product photography can be created in two main ways: photographing products against a physical white backdrop using a camera and lighting equipment, or using AI design tools to remove existing backgrounds and produce clean white product images. DIY photography offers greater control over physical product accuracy, while AI photography makes background editing and image production easier to scale.
For ecommerce sellers, the decision involves more than image quality. Equipment investment, editing time, product authenticity, and catalog consistency all affect the final production cost. Virse.ai provides an AI-powered creative environment for exploring different visual production workflows.
Neither approach works equally well for every product. White clothing, jewelry, reflective electronics, and products with complex textures each present different challenges. This guide compares both methods, explains how to use them, and shows when a hybrid AI product design workflow makes more sense.

DIY vs AI White Background Product Photography: What's the Difference?
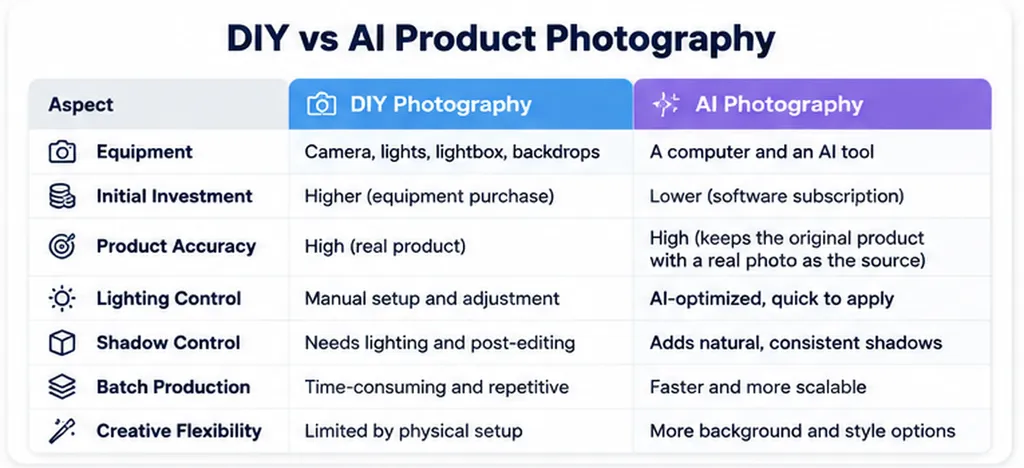
DIY photography captures the physical product against a real white background. AI photography uses image processing or generative editing to remove, replace, or improve the background of an existing product image.
The key distinction is that DIY controls the photography environment, while AI controls the digital editing process.
Comparison | DIY Photography | AI Photography |
|---|---|---|
Equipment | Camera, lights, tripod, backdrop | Existing product photo and AI software |
Initial investment | Physical equipment and setup | Software access and suitable source images |
Learning curve | Requires lighting and camera knowledge | Usually easier for basic background editing |
Background control | Physical backdrop and lighting | Digital background removal and replacement |
Product accuracy | Captures the actual physical product | Depends on how well the original details are preserved |
Lighting | Controlled during shooting | Adjusted through editing or generation |
Shadows | Created by physical light sources | Retained, simulated, or edited |
Batch production | Requires a repeatable shooting setup | Can streamline repetitive editing |
Creative flexibility | Requires physical setups | Easier to explore alternative visual treatments |
Best application | Accurate product documentation | Background editing and visual production |
Is DIY or AI Better for Different Product Types?
The answer depends on how much visual accuracy matters.
- Jewelry: DIY is preferable for capturing intricate details and reflections. AI can help clean the background.
- White clothing: Real photography helps preserve fabric texture, stitching, and color. AI can standardize the background.
- Electronics: Original photography is important for accurate ports, buttons, logos, and dimensions.
- Cosmetics: AI can simplify background editing, but labels, packaging text, and product colors require careful inspection.
- Home decor: A hybrid workflow can combine accurate product photography with AI-assisted presentation.
- Large ecommerce catalogs: Standardized photography combined with batch editing can reduce repetitive work.
The most important question is not which method produces the prettiest image. It is which method produces an accurate, usable image with the least total production effort.
How to Create White Background Product Photos DIY
You do not need a professional studio to create clean product photographs. A simple home setup can work if you control the background, lighting, camera settings, and product positioning.
Prepare a White Background
Start with a clean, matte white surface.
Common options include:
- White seamless photography paper.
- White PVC boards.
- White foam boards.
- White fabric backdrops.
A curved white background, also called a seamless sweep, eliminates the visible corner between the wall and the surface.
For small products, foam boards can also work as reflectors to bounce light back onto darker areas.
Avoid heavily textured or glossy materials unless you specifically need their visual effects.
Set Up Your Lighting
Lighting is often the most difficult part of white background product photography.
A basic setup can include:
- A main light positioned at an angle to the product.
- A diffuser to soften harsh highlights.
- A reflector to reduce unwanted shadows.
- Separate background illumination when necessary.
The objective is to illuminate the background evenly without washing out the product.
A common mistake is increasing exposure until the entire image looks white. This can destroy important details, especially when photographing white objects against white backgrounds.
Adjust Your Camera Settings
For consistent results, use manual camera settings whenever possible.
Pay attention to:
- ISO: Keep it low to reduce image noise.
- Aperture: Choose an appropriate depth of field to keep important product details sharp.
- Shutter speed: Adjust according to available lighting and camera stability.
- White balance: Maintain consistent color reproduction.
- Focus: Make sure important product features remain sharp.
A tripod also helps maintain consistent framing when photographing multiple products.
Photograph Multiple Angles
For ecommerce, one attractive front-facing image is rarely enough.
Capture:
- Front view.
- Side view.
- Three-quarter view.
- Rear view.
- Close-up details.
Keep the camera position, product scale, and lighting consistent across the collection.
Edit the Background
Even a properly illuminated white backdrop can appear gray in the final photograph.
Use Photoshop, Lightroom, or another editing application to adjust exposure, white balance, highlights, and background brightness.
When editing white products, pay particular attention to their edges. Excessive background whitening can remove the subtle tonal differences that make the product visible.
How to Create White Background Product Photos with AI
AI product photography can simplify the process of preparing ecommerce images, especially when you already have photographs of your products.
Instead of rebuilding a physical photography setup, you can use an existing image as the starting point and digitally improve its presentation.
Upload a Real Product Photograph
Choose a source image with:
- The entire product visible.
- Clearly defined edges.
- Reasonable lighting.
- Minimal obstruction.
- Sufficient resolution.
A clean source image reduces the amount of correction needed later.
For important ecommerce listings, use an original photograph rather than relying entirely on text-to-image generation.
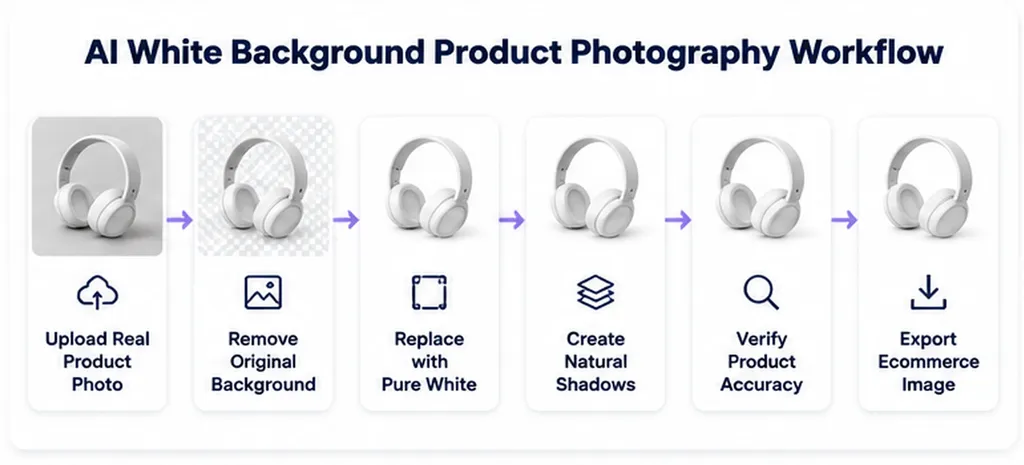
Remove the Original Background
Use an AI background removal tool to separate the product from its surroundings.
Inspect difficult areas such as:
- Transparent glass.
- Thin wires and components.
- Fabric fibers.
- Jewelry edges.
- Reflective surfaces.
Automatic background removal may struggle when the product and background have similar colors.
For example, a white ceramic object photographed against a white wall may have very little edge contrast.
Replace the Background with Pure White
Once the product is isolated, add a clean white background.
For standard ecommerce presentation, a solid white background offers a neutral appearance and makes it easier to maintain consistency across product listings.
Check the edges for unwanted halos, gray outlines, and color contamination.
Create Natural Product Shadows
A product placed on a completely white background can look as though it is floating.
A subtle contact shadow helps establish the relationship between the product and the surface beneath it.
Consider:
- Shadow direction: It should match the lighting direction.
- Shadow softness: Diffused light generally produces softer shadows.
- Contact points: The darkest area should usually be close to where the product touches the surface.
- Shadow density: Avoid shadows that are too dark or too artificial.
Do not remove every original shadow automatically. Sometimes preserving part of the original shadow produces a more natural result than generating a completely new one.
Verify Product Accuracy
This is the most important quality-control step.
Compare the edited image with the original photograph.
Check whether AI has changed:
- Product shape and proportions.
- Original colors.
- Logos and packaging text.
- Fabric or material textures.
- Buttons, stitching, and small components.
- Reflections and transparent areas.
For products where accuracy matters, use non-generative background removal and editing wherever possible.
If generative editing is used, inspect the final image carefully before publishing.
For more guidance on preserving original designs, see how to preserve design accuracy in AI mockups.
Standardize the Final Images
Before uploading images to your ecommerce store, establish consistent production specifications.
Specification | What to Standardize |
|---|---|
Background | Consistent white appearance |
Image dimensions | Same export dimensions |
Product scale | Similar visual size within a category |
Positioning | Consistent center alignment |
Lighting | Consistent brightness and color temperature |
Shadows | Similar direction and softness |
File format | Consistent format and compression |
Cropping | Consistent margins |
This is particularly important for large product catalogs, where small differences become noticeable when images appear together.
DIY vs AI Product Photography: How Much Does Each Method Really Cost?
The cheapest workflow is not necessarily the one with the lowest initial investment. To compare DIY and AI photography properly, you need to consider equipment, software, labor, editing, and quality-control costs.
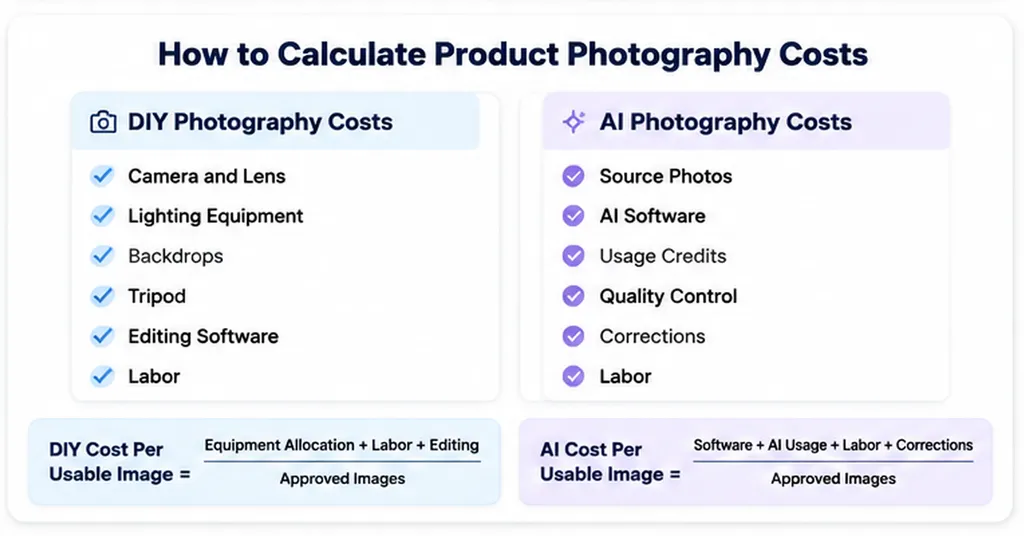
DIY Photography Costs
A DIY setup may involve:
- Camera and lens.
- Lighting equipment.
- Light stands and diffusers.
- White backdrops.
- Tripod.
- Editing software.
- Workspace.
Some of these are one-time purchases, while others may involve ongoing replacement or maintenance costs.
The main advantage is that equipment can be reused across many products.
However, the initial setup may be difficult to justify for businesses with limited photography needs.
AI Photography Costs
AI-assisted workflows generally require:
- Existing product photographs.
- An AI editing or background removal tool.
- Software subscriptions or usage credits, depending on the platform.
- Time for reviewing and correcting results.
The main advantage is reduced physical setup and potentially less repetitive editing.
However, AI costs are not automatically lower. Usage limits, high-resolution exports, manual corrections, and failed generations can all affect the total.
Calculate the Actual Cost Per Usable Image
A useful way to compare both approaches is to calculate the cost of producing an image that is actually ready to publish.
DIY cost per usable image:
[
\frac{\text{Equipment allocation + Labor + Editing}}{\text{Approved images}}
]
AI cost per usable image:
[
\frac{\text{Software + AI usage + Labor + Corrections}}{\text{Approved images}}
]
For example, if an AI workflow generates several variations but only a portion pass quality control, the cost should be calculated using approved images rather than total generations.
You should also consider the volume of products processed.
A DIY studio may become more economical when it is used continuously. AI may be more practical when image editing needs vary or physical studio setup is difficult.
The best comparison is cost per approved image, not cost per generated image or the price of a software subscription.
What Are the Biggest Problems with White Background Product Photography?
Both DIY and AI workflows have limitations. Understanding them helps prevent common ecommerce image-quality problems.
White Products Disappear into White Backgrounds
When a white product and its background have similar brightness, the edges become difficult to distinguish.
DIY solution:
- Use soft directional lighting.
- Adjust background and product illumination separately.
- Preserve subtle shadows.
- Avoid excessive exposure.
AI solution:
- Start with a clear source photograph.
- Preserve original product edges.
- Add subtle contact shadows.
- Avoid aggressive background whitening.
Reflective Products Show Unwanted Reflections
Metallic products, watches, glass, and glossy packaging reflect surrounding objects and light sources.
For DIY photography, use larger diffusers and carefully positioned lights.
For AI editing, inspect reflective surfaces to make sure the correction has not made the material look artificial.
Products Look Like They Are Floating
Removing the background without preserving a contact shadow can make a product appear disconnected from the surface.
Use a subtle shadow beneath the product and make sure its direction matches the lighting.
Different Product Images Look Inconsistent
Different camera angles, lighting conditions, white balances, and cropping decisions can make an ecommerce catalog look disorganized.
Create a standardized image specification covering:
- Background appearance.
- Product scale.
- Camera angle.
- Image dimensions.
- Lighting direction.
- Shadow appearance.
AI can help apply consistent editing rules, but every output should still be checked against the original product.
AI Changes the Original Product
Generative editing may reconstruct portions of an image instead of simply modifying its background.
This is particularly risky for products with distinctive logos, labels, technical components, or precise dimensions.
Use background removal and conventional editing when preserving the original product is more important than creating a new visual environment.
How Can You Maintain Consistent Product Photography Across Hundreds of Products?
Batch consistency is one of the most important considerations for growing ecommerce businesses.
A product catalog should look like a unified collection rather than hundreds of individually edited photographs.
The challenge is not simply producing more images. It is ensuring that every image follows the same visual specifications.
Build a Repeatable Product Photography Workflow
Step 1: Define image specifications.
Establish background color, image dimensions, product positioning, lighting direction, and cropping requirements.
Step 2: Standardize original photography.
Use consistent camera settings, lighting, and product angles whenever possible.
Step 3: Separate products into categories.
Different product materials require different treatment. Jewelry, clothing, electronics, and transparent packaging should not necessarily use identical editing settings.
Step 4: Apply consistent background editing.
Use repeatable background removal and editing processes rather than manually creating every image from scratch.
Step 5: Run quality checks.
Compare product details, edges, shadows, colors, and positioning.
Step 6: Approve images before publishing.
Keep original source images so that incorrect edits can be corrected without repeating the photography process.
Use a Product Image Quality-Control Checklist
Quality Check | What to Look For |
|---|---|
Product accuracy | No altered shapes, labels, or logos |
Background | Clean and consistently white |
Edges | No visible halos or missing details |
Color | Matches the physical product |
Texture | Original material details remain visible |
Shadows | Natural and consistent |
Positioning | Product scale and alignment are consistent |
Resolution | Suitable for the intended ecommerce display |
This workflow is particularly useful when several people or tools are involved in product image production.

Should You Use DIY, AI, or a Hybrid Product Photography Workflow?
The best approach depends on product accuracy, production volume, available equipment, and the intended use of the images.
Business Scenario | Recommended Workflow | Why |
|---|---|---|
Jewelry and reflective products | DIY + AI editing | Preserve real details while improving backgrounds |
White clothing | DIY + AI editing | Protect fabric texture and edges |
Electronics | DIY photography | Maintain accurate product components |
Small ecommerce business | AI-assisted editing | Reduce physical setup requirements |
Large product catalog | Hybrid workflow | Standardize photography and repetitive editing |
Lifestyle product images | AI-assisted creative production | Explore different visual environments |
High-value products | DIY + careful post-processing | Prioritize product authenticity |
Why a Hybrid Workflow Often Makes More Sense
For many ecommerce businesses, the most practical approach is to photograph the actual product first and use AI to simplify the editing process.
A hybrid workflow can look like this:
Real product photograph → Background removal → White background replacement → Shadow refinement → Product accuracy check → Final ecommerce image
This approach combines the physical accuracy of photography with the editing flexibility of AI.
It also reduces dependence on fully generated product images, which may introduce unwanted changes to important product details.
How Virse.ai Fits into an AI-Assisted Product Photography Workflow
AI-assisted product photography is not only about generating attractive images. Ecommerce sellers need to improve visual presentation while keeping the actual product recognizable and accurate.
Virse.ai offers an AI-powered creative environment for exploring and refining visual assets. Its multi-model creative workflow can be useful when developing different visual directions and experimenting with product image presentation.
A practical workflow is:
- Start with an original product photograph.
- Identify what needs improvement, such as the background, lighting, or overall composition.
- Use suitable image-editing capabilities to explore the desired visual treatment.
- Compare the output with the original photograph.
- Verify that the product's shape, colors, branding, and material details remain accurate.
- Export only images that pass your quality requirements.
The important distinction is between creative enhancement and product reconstruction.
For a standard ecommerce listing, prioritize a faithful representation of the real product. For supplementary marketing images, you have more flexibility to explore different visual directions.
Explore Virse.ai to experiment with AI-assisted visual creation and product image workflows.
FAQs About White Background Product Photography
How can I take professional product photos with a pure white background at home?
Use a white seamless backdrop, a camera or smartphone, and soft lighting. Position the product away from the background to control shadows and reflections. Adjust exposure and white balance carefully. If the background still looks gray, correct it during editing without removing the product's natural edges or texture.
Can I create white background product photos without expensive studio equipment?
Yes. A smartphone, white foam board, natural window light, and a reflector can be enough for basic product photography. Position the product near soft natural light and use a clean background. You can also use AI background removal to simplify the editing process.
Is AI product photography better than a DIY lightbox setup?
AI is generally more convenient for background replacement and repetitive editing, while a DIY lightbox provides direct control over the physical product, lighting, and reflections. For businesses that need accurate product documentation, a combination of real photography and AI editing is often more suitable.
How do I photograph white products without losing their edges and details?
Avoid overexposing the entire image. Use soft directional lighting and control the background brightness separately from the product. Introduce subtle shadows or a slightly different lighting angle to maintain edge contrast. During editing, preserve the original product texture and avoid turning every light area into pure white.
Can AI replace traditional product photography for ecommerce?
AI can replace some repetitive background editing and creative image production tasks, but it should not automatically replace accurate product photography. Product shape, color, texture, and branding must remain correct. Real photography remains important when customers need to see precisely what they are purchasing.
How can I make AI-generated product photos look realistic?
Start with a high-quality photograph of the actual product. Preserve its original geometry and surface details. Match the lighting direction between the product and background, and use realistic contact shadows. Inspect reflections, edges, and colors before publishing the final image.
Can AI keep the original product shape, color, and texture unchanged?
Background removal and conventional image editing are generally safer for preserving product appearance than fully generative editing. However, no automated workflow should be assumed to preserve every detail perfectly. Compare the final result with the original image, particularly around logos, labels, textures, and product edges.
What is the best way to create consistent white background photos for hundreds of products?
Start with standardized source photography. Keep camera positioning, lighting, white balance, and product framing consistent. Then apply the same background and editing specifications across the catalog. Use batch-processing tools where appropriate, followed by quality checks to catch inconsistent edges, shadows, and colors.