
Ubah Satu Gambar Menjadi Daftar Bidikan AI Lengkap dengan MiniMax H3
 Yifan Zhao10 menit baca ·
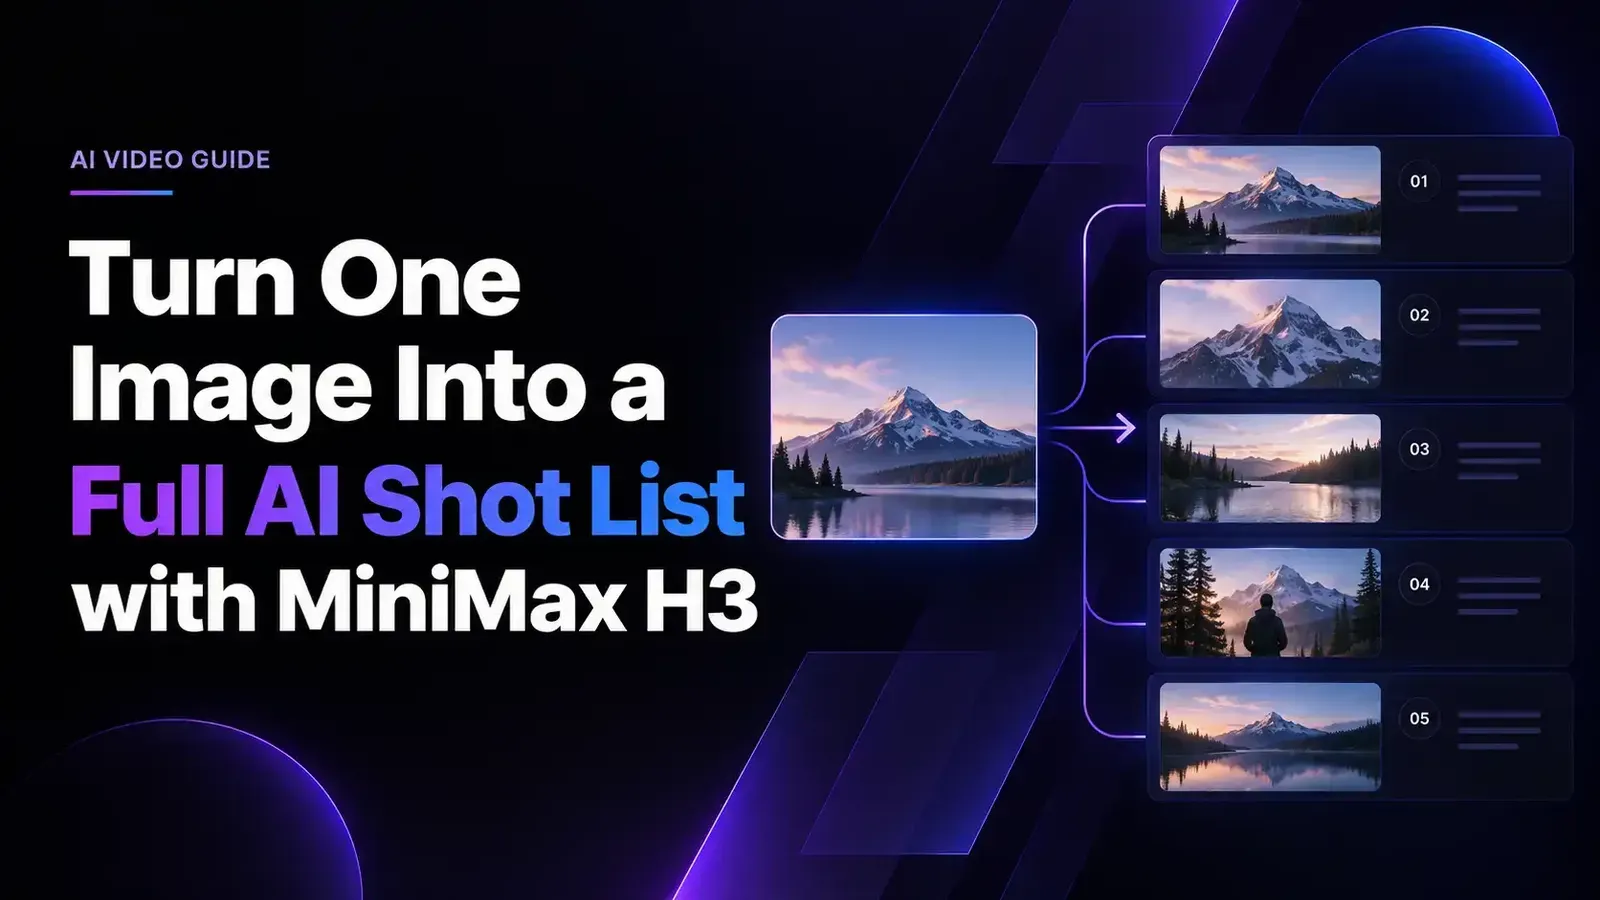
Anda dapat mengubah satu gambar menjadi daftar bidikan AI lengkap dengan MiniMax H3, memakai gambar tersebut sebagai jangkar visual untuk berbagai sudut kamera, frame storyboard, dan rencana gerak khusus tiap bidikan. Alih-alih menganggap gambar hanya sebagai frame pertama, Anda dapat mengembangkannya menjadi bidikan lebar, close-up, tampilan detail, sudut alternatif, dan rangkaian lengkap beberapa bidikan melalui alur referensi yang terstruktur.
Kesulitannya adalah konsistensi. Ketika daftar bidikan bertambah, pembingkaian bisa bergeser, subjek terpotong, transisi gagal, dan pembuatan berantai dapat perlahan menurunkan kualitas karakter atau lingkungan. Pendekatan yang lebih andal adalah merencanakan cakupan bidikan terlebih dahulu, membangun referensi visual yang dapat digunakan ulang, dan memisahkan perubahan kamera besar daripada memaksakan semua keputusan ke dalam satu alur pembuatan yang panjang.
Virse menyatukan alur ini dalam satu ruang kerja visual, tempat desainer dapat mengatur referensi, storyboard, aset, dan tugas AI pada kanvas tanpa batas. MiniMax H3, Seedance 2.0 dan Seedance 2.5, Nano Banana 2, GPT Image 2, serta lebih dari 40 model tersedia, dengan penggunaan model dan kursi pengguna tanpa batas pada paket berbayar. Pengguna baru juga menerima kredit gratis untuk hingga 10 gambar Nano Banana 2 atau satu video Seedance 2.0.
Bagaimana MiniMax H3 Mengubah Satu Gambar Menjadi Daftar Bidikan AI Lengkap?
Sebuah daftar bidikan MiniMax H3 adalah kumpulan pandangan kamera terencana dari satu konsep visual, dengan tiap bidikan menentukan pembingkaian, aksi, perilaku kamera, kesinambungan, dan audio opsional. Gambar asli menetapkan hal yang harus tetap stabil secara visual; daftar bidikan menentukan cakupan tambahan yang dibutuhkan suntingan akhir.
Untuk video produk, satu gambar utama dapat menjadi bidikan lebar lingkungan, bidikan utama tiga perempat depan, profil samping, close-up material, detail makro, sudut rendah, bidikan interaksi, dan frame penutup. Untuk rangkaian karakter, logika yang sama menghasilkan cakupan tubuh penuh, profil, reaksi, lewat bahu, sisipan, dan lingkungan.
Menghasilkan lebih banyak sudut tidak sama dengan membangun daftar bidikan. Setiap bidikan terencana harus menambah informasi visual atau naratif yang benar-benar dapat dipakai editor.
Bagaimana Membuat Daftar Bidikan MiniMax H3 dari Satu Gambar Referensi?
Alur MiniMax H3 terbaik memisahkan perencanaan visual dari pembuatan gerak. Meminta satu render menyelesaikan identitas, geometri yang tidak terlihat, pembingkaian, aksi, lingkungan, dan gerak kamera sekaligus membuka peluang penyimpangan yang tidak perlu.
Ekstrak Jangkar Kesinambungan Sebelum Membuat Bidikan Baru
Tentukan dahulu hal yang tidak boleh berubah.
Untuk karakter, pertahankan wajah, gaya rambut, pakaian, aksesori, proporsi, dan hubungan warna. Untuk produk, lindungi geometri, material, logo, detail permukaan, dan konstruksi. Untuk lingkungan, lacak arah pencahayaan, arsitektur, properti penting, dan hubungan spasial.
Saya memperlakukan hal-hal tersebut sebagai jangkar kesinambungan. Jika sumber hanya menampilkan produk dari depan, membuat referensi belakang sebelum animasi lebih andal daripada meminta bidikan bergerak menciptakan geometri itu. Prinsip yang sama mendukung konsistensi karakter yang lebih kuat.
Rencanakan Cakupan untuk Penyuntingan Sebelum Gerak
Tanyakan apa yang sungguh dibutuhkan suntingan akhir. Bidikan mana memperkenalkan lokasi? Pandangan mana menjelaskan subjek paling jelas? Detail apa layak mendapat close-up? Sudut alternatif mana menambah informasi? Di mana potongan edit harus dilakukan?
Dalam praktiknya, enam hingga delapan bidikan yang memiliki tujuan sering lebih berguna daripada dua puluh variasi acak, karena setiap bidikan punya peran jelas.
Tentukan Enam Hal untuk Setiap Bidikan H3
Bidikan siap produksi perlu menetapkan subjek, pembingkaian, aksi, kamera, batasan, serta audio jika relevan.
Contohnya, bidikan tubuh penuh saat berjalan membutuhkan lebih dari “karakter berjalan menuju kamera”. Bidikan itu juga harus menentukan apakah kamera mengikuti sambil mundur, seberapa cepat geraknya, pembingkaian apa yang tetap terkunci, dan apakah zoom dilarang.
Tinjauan kami atas pertanyaan alur H3 berulang kali menemukan zoom tak diinginkan, subjek terpotong, pembingkaian ulang tak terduga, dan gerak kamera yang bersaing dengan aksi tujuan. Batasan kamera harus sejelas aksi subjek.
Bagaimana MiniMax H3 Mengubah Satu Gambar Menjadi Lembar Referensi Berbagai Sudut?
Sebelum membuat gerak, kembangkan gambar asli menjadi informasi visual yang dibutuhkan bidikan mendatang. Lembar referensi yang dapat digunakan ulang mengurangi hal yang harus diciptakan H3 saat juga berusaha menganimasikan adegan.
Studi Kasus: Satu Gambar Karakter Menjadi Beberapa Pandangan
Satu alur H3 terdokumentasi menghasilkan beberapa suntingan dalam satu lembar referensi komposit, termasuk tampak samping, tubuh penuh, ekspresi, perubahan rambut, dan aksesori.
Pada RTX 3060 dengan alur REF2V delapan langkah, pembuatan yang dilaporkan membutuhkan sekitar 7 menit 50 detik, dengan keluaran beberapa panel yang dilaporkan berukuran 7680 × 4320.
Hasil yang berguna bukan resolusinya sendiri. Satu gambar identitas menjadi kosakata visual yang dapat digunakan ulang untuk bidikan berikutnya.
Studi Kasus: Cakupan Depan, Samping, Belakang, dan Pose
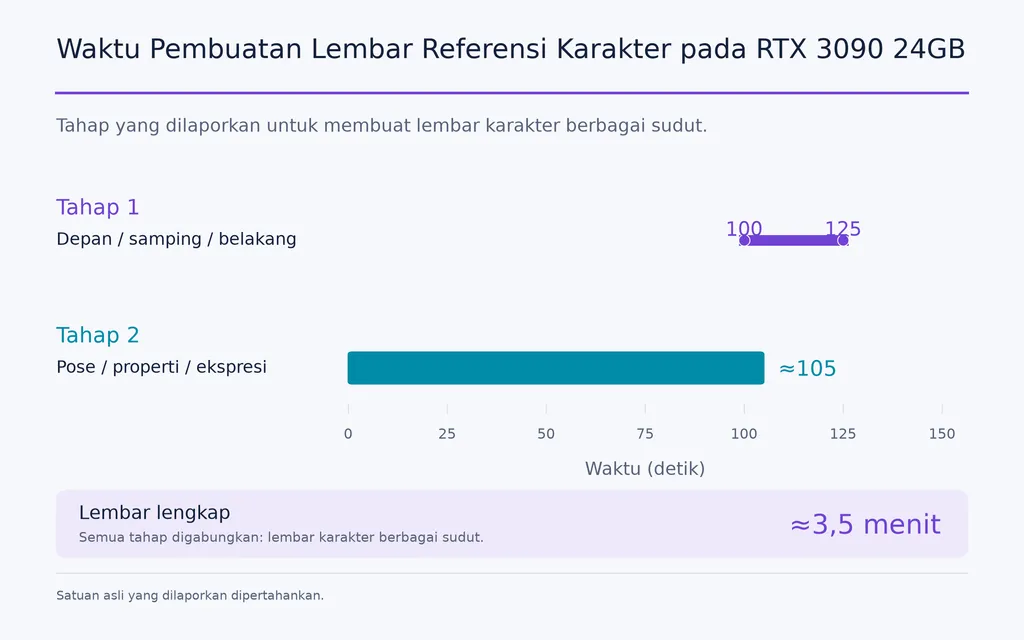
Alur lain menggabungkan referensi wajah dan gambar pakaian. Tahap pertama menghasilkan tampak depan, samping, dan belakang; tahap kedua menambahkan pose, properti, ekspresi, dan latar.
Pada sistem RTX 3090 24GB, tahap pertama dilaporkan membutuhkan 100–125 detik, tahap kedua sekitar 105 detik, dan seluruh lembar kira-kira 3,5 menit.
Pelajaran produksinya sederhana: gunakan komputasi sekali untuk menetapkan informasi visual yang hilang, lalu gunakan ulang di seluruh daftar bidikan. Pendekatan yang sama berlaku untuk produk, kendaraan, kemasan, interior, dan konsep desain industri.
Bagaimana Memakai Satu Gambar Storyboard untuk Pembuatan Beberapa Bidikan MiniMax H3?
Lembar referensi menentukan tampilan. Storyboard menentukan urutan.
Satu gambar storyboard dapat memuat beberapa komposisi, ukuran bidikan, posisi subjek, tahap aksi, dan petunjuk kesinambungan. Dengan demikian, satu aset visual menjadi dokumen perencanaan bidikan yang ringkas, bukan sekadar frame untuk dianimasikan.
Studi Kasus: Satu Storyboard sebagai Rencana Visual Bidikan
Dalam satu alur yang kami teliti, storyboard komposit menjadi referensi visual utama, dan H3 menafsirkan panelnya sebagai maksud bidikan yang berurutan.
Ini penting karena komposisi kamera pada dasarnya adalah informasi visual. Menunjukkan frame yang diinginkan dapat menyampaikan sudut pandang dan posisi subjek lebih efisien daripada membenamkan setiap hubungan spasial dalam prompt panjang.
Keyframe Berwaktu Membutuhkan Perubahan Bidikan Terkontrol
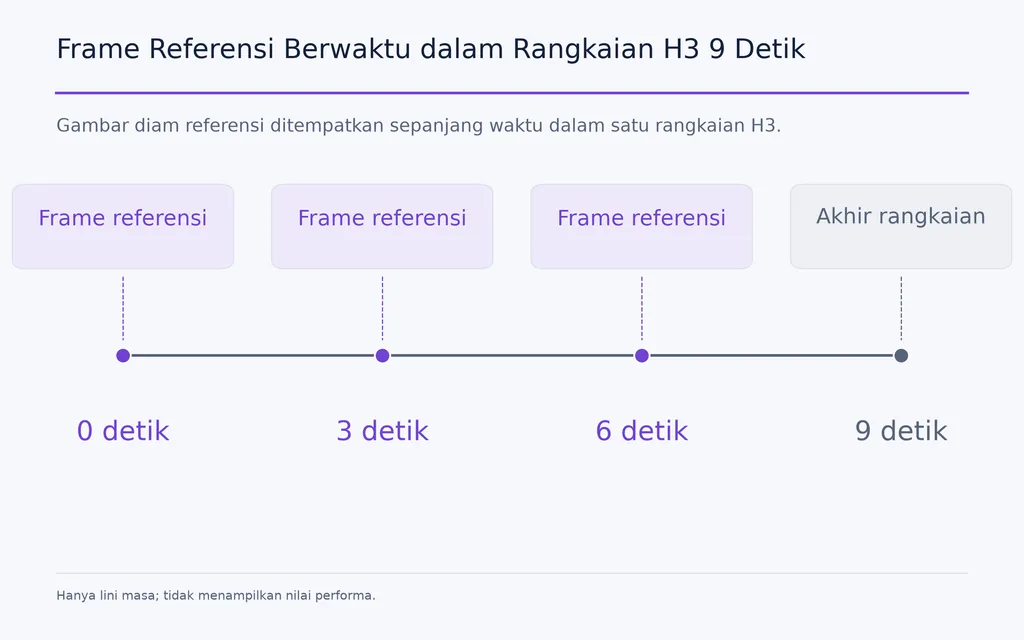
Alur lain menempatkan gambar diam referensi di sekitar detik 0, 3, dan 6 dalam rangkaian sembilan detik.
Perubahan besar antarreferensi, seperti beralih dari bidikan lebar ke close-up atau mengubah tinggi kamera secara signifikan, dapat membuat model meneruskan komposisi lama alih-alih sepenuhnya memakai komposisi baru.
Ini menunjukkan aturan praktis: gunakan referensi berwaktu untuk perkembangan visual yang saling terkait, tetapi render perubahan besar dari bidikan lebar ke close-up atau perubahan sudut pandang sebagai bidikan terpisah ketika presisi penting.
Apa yang Diungkap Studi Kasus Daftar Bidikan MiniMax H3 tentang Video Beberapa Bidikan?
Eksperimen lebih panjang mengungkap kapan perencanaan bidikan lebih berharga daripada pembuatan sekali jalan.
Alur Perpanjangan 30 Detik: Biaya Membuat Ulang Semuanya
Satu alur H3 beberapa adegan yang dikustomisasi menghasilkan sekitar 30 detik pada sekitar 0,4MP menggunakan RTX 3090.
Setiap percobaan yang dilaporkan membutuhkan sekitar 570 detik, atau 9,5 menit, dan diperlukan empat percobaan sebelum hasil memuaskan tercapai.
Ini alur perpanjangan, bukan durasi standar satu klip H3. Pelajaran produksi yang penting adalah biaya pengulangan: jika satu bagian gagal, membuat ulang seluruh rangkaian kurang efisien daripada merender ulang satu bidikan mandiri.
Uji Rantai 70 Detik: Kesinambungan Dapat Mengakumulasi Kesalahan
Alur perpanjangan lain meneruskan frame terakhir setiap bidikan ke pembuatan berikutnya.
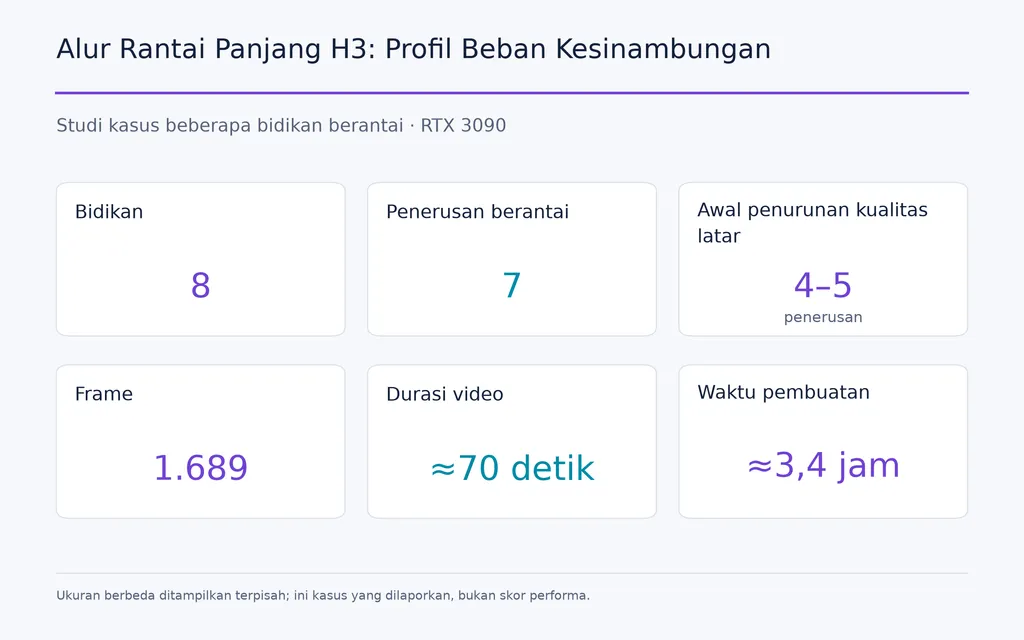
Hasil yang dilaporkan mencapai 8 bidikan, 1.689 frame, sekitar 70 detik, tujuh penerusan, dan kira-kira 3,4 jam waktu pembuatan pada RTX 3090.
Identitas karakter tetap relatif stabil, tetapi detail latar tampak memburuk setelah sekitar empat hingga lima penerusan.
Ini mengungkap perbedaan penting: kesinambungan tidak sama dengan pewarisan. Memakai ulang frame hasil generasi dapat menjaga aliran jangka pendek sekaligus perlahan mengubah kesalahan sebelumnya menjadi informasi referensi baru.
Berapa Banyak Komputasi yang Dibutuhkan Daftar Bidikan MiniMax H3?
Daftar bidikan juga merupakan anggaran komputasi, terutama dalam alur H3 lokal.
Satu konfigurasi RTX 3060 12GB melaporkan sekitar 25 menit untuk pembuatan I2V lima detik pada 2MP, sedangkan render delapan detik mengharuskan pengerjaan lebih dekat ke sekitar 1,4MP.
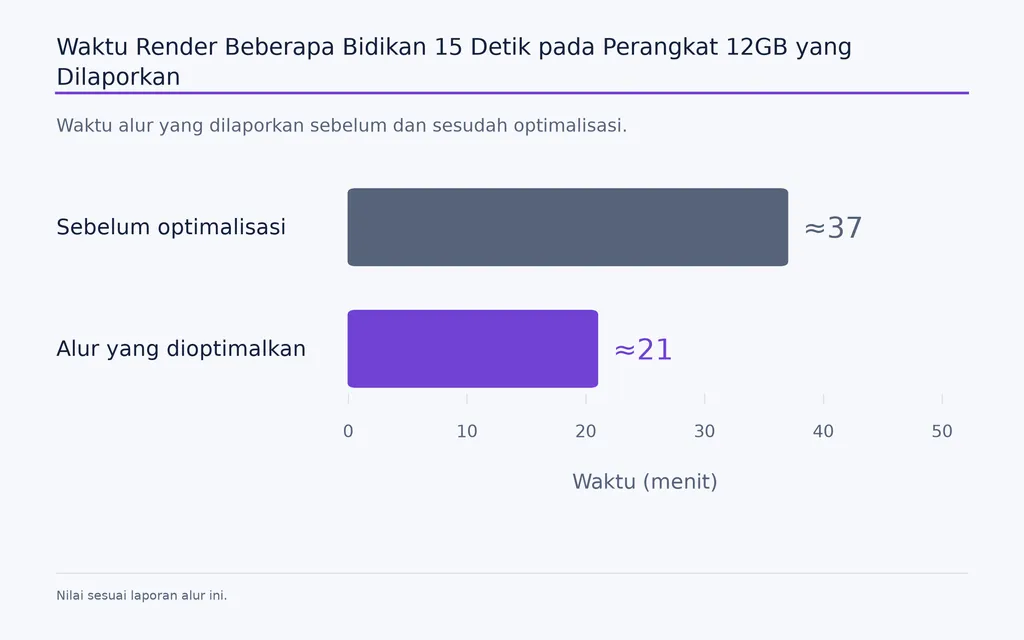
Konfigurasi beberapa bidikan 15 detik lain yang dioptimalkan mengurangi waktu render yang dilaporkan dari sekitar 37 menit menjadi 21 menit. Alur perpanjangan berikutnya menghasilkan tiga segmen sepuluh detik dalam sekitar 14 menit 49 detik.
Panjang referensi juga dapat memengaruhi kapasitas praktis. Dalam satu uji Ref2Video 12GB, referensi penggerak 20 detik sangat membatasi keluaran yang bisa dicapai; memangkas referensi menjadi lima detik membuat pembuatan lebih panjang menjadi praktis.
Pelajaran alurnya konsisten: buat draf dengan biaya rendah, pendekkan referensi sesuai kebutuhan nyata setiap bidikan, dan simpan render kualitas akhir untuk bidikan yang disetujui.
Bagaimana Menjaga Konsistensi Bidikan MiniMax H3 di Berbagai Sudut Kamera?
Strategi paling andal adalah mempertahankan lapisan acuan visual yang stabil, bukan menjadikan setiap frame baru hasil generasi sebagai referensi utama.
Gunakan referensi subjek baku untuk identitas, referensi lingkungan utama untuk lokasi dan pencahayaan, serta referensi khusus bidikan untuk komposisi.
Hierarkinya menjadi:
Subjek utama → lingkungan utama → referensi bidikan → pembuatan gerak
Riset kami juga menemukan eksperimen menggunakan satu panorama 360 derajat sebagai konteks lingkungan yang lebih kaya untuk beberapa arah kamera. Gerakan rumit masih dapat menimbulkan masalah geometri, tetapi prinsipnya berguna: semakin banyak informasi spasial stabil yang dipertahankan di luar klip hasil generasi, semakin jarang model harus membangun ulang dunia dari awal.
Haruskah Memakai I2V atau R2V untuk Daftar Bidikan MiniMax H3?
Gunakan I2V ketika frame awal menjadi jangkar visual utama. Gunakan R2V ketika beberapa referensi, frame storyboard, pandangan karakter, logo, atau konteks visual lain perlu memengaruhi hasil.
Dalam alur H3, Anda juga dapat menjumpai FL2VA untuk pengondisian frame pertama/terakhir serta Ref2VA untuk pengondisian referensi lebih luas. Istilah ini berguna saat membandingkan alur teknis, sementara I2V dan R2V tetap umum dipakai dalam pencarian.
Riset kami menemukan preferensi beragam mengenai kualitas keluaran yang dirasakan. Pertanyaan yang lebih baik bukan mode mana yang selalu tampak lebih bagus, tetapi apakah bidikan membutuhkan kesetiaan frame lebih kuat atau kontrol banyak referensi yang lebih kuat.
Apa Alur MiniMax H3 Terbaik untuk Mengubah Satu Gambar Menjadi Daftar Bidikan Lengkap?
Untuk produksi profesional, saya menyarankan urutan ini:
- Pilih satu gambar utama yang kuat, dengan identitas, geometri, pencahayaan, dan arah visual yang jelas.
- Ekstrak jangkar kesinambungan yang tidak boleh berubah.
- Rencanakan enam hingga delapan bidikan yang berguna untuk penyuntingan sebelum membuat video.
- Buat sudut pandang yang belum tersedia, seperti referensi profil, belakang, detail, pose, atau lingkungan.
- Bangun storyboard dari pandangan terbaik.
- Tentukan pembingkaian, aksi, kamera, batasan, waktu, dan audio untuk setiap bidikan.
- Render draf murah terlebih dahulu untuk menguji komposisi dan gerak.
- Render perubahan sudut pandang besar secara mandiri, bukan memaksakan transisi yang tidak andal.
- Kembali ke referensi utama yang bersih ketika penyimpangan muncul.
- Lakukan pemeriksaan kualitas per bidikan untuk identitas, pembingkaian, kesinambungan spasial, perilaku kamera, dan audio sebelum render serta penyuntingan akhir.
Prinsip utamanya adalah membuat H3 menjalankan rencana visual, bukan memintanya menciptakan rencana dan rekaman akhir sekaligus.
Apakah MiniMax H3 Praktis untuk Membuat Daftar Bidikan Lengkap dari Satu Gambar?
Ya, terutama ketika gambar asli menjadi awal sistem visual yang dapat digunakan ulang, bukan sekadar frame pertama I2V. Alur H3 dapat mengembangkan referensi terbatas menjadi lembar berbagai sudut, menafsirkan struktur storyboard, memakai jangkar visual berwaktu, dan mendukung produksi beberapa bidikan. Eksperimen saat ini juga menunjukkan batas perilaku kamera tak terkontrol, rantai referensi panjang, transisi sudut pandang besar, dan biaya komputasi lokal. Jadi, alur terkuat adalah satu gambar → cakupan visual → daftar bidikan terstruktur → produksi beberapa bidikan terkontrol, dengan desainer tetap mengendalikan kesinambungan, keputusan penyuntingan, dan pemeriksaan kualitas akhir.
Pertanyaan Umum Daftar Bidikan MiniMax H3
Bisakah H3 memakai satu gambar storyboard untuk mengontrol beberapa bidikan?
Ya. Storyboard beberapa panel dapat menyampaikan maksud beberapa bidikan melalui komposisi, posisi subjek, dan urutan. Untuk perubahan besar seperti transisi bidikan lebar ke close-up, pembuatan terpisah biasanya lebih mudah dikontrol daripada meminta satu klip berkesinambungan menyelesaikan seluruh transisi.
Haruskah memakai I2V atau R2V untuk alur storyboard H3?
Gunakan I2V saat mempertahankan frame awal menjadi prioritas. Gunakan R2V ketika beberapa aset referensi perlu memengaruhi bidikan. Untuk daftar rumit, pilih berdasarkan kesetiaan frame dibandingkan fleksibilitas referensi, bukan menganggap satu mode selalu menghasilkan kualitas lebih tinggi.
Bagaimana mencegah H3 melakukan zoom atau memotong bidikan tubuh penuh?
Tentukan gerak kamera dan pembingkaian secara bersamaan. Nyatakan arah kamera, kecepatan atau amplitudo gerak, pembingkaian subjek yang dibutuhkan, dan hal yang tidak boleh dilakukan kamera. Referensi tubuh penuh yang jelas juga memberi bukti visual lebih kuat daripada batasan teks saja. Untuk kontrol spasial lebih eksplisit, panduan pose dan kedalaman juga dapat membantu menyusun bidikan.
Apakah VRAM 12GB Cukup untuk Alur Beberapa Bidikan H3?
Bisa cukup, tetapi durasi, resolusi, panjang referensi, dan optimalisasi berpengaruh. Alur 12GB terdokumentasi menunjukkan klip resolusi tinggi masih bisa memakan puluhan menit, sehingga pembuatan draf terlebih dahulu, referensi lebih pendek, dan render akhir selektif jauh lebih praktis daripada langsung merender setiap bidikan pada kualitas maksimal.
Artikel lainnya dari Blog Virse
Alur kerja
FLUX 3 Image Prompt Guide: 12 Prompts & Editing Fixes
22 Oktober 2026 by Vincent
Alur kerja
How to Use FLUX 3 Image: Edit Photos Without Unwanted Changes
21 Oktober 2026 by Vincent
Alur kerja
Wan 3.0 Prompt Guide: Fix Wrong Motion, Character Drift, and Ignored Instructions
20 Oktober 2026 by Yifan Zhao