
How to Use Nano Banana in Photoshop: Complete 2026 Workflow
 Yifan Zhao12 min read ·
To use Nano Banana in Photoshop, open an image, select the area you want to change, choose Generative Fill, open the model picker, select a Gemini model under Partner Models, enter a precise prompt, and generate the edit. The most reliable results come from treating the generated output as a new compositing layer, then refining it with masks, alignment, color correction, and texture matching. The same controlled approach applies when learning how to use Nano Banana to edit photos.
The main difficulty is not accessing the model. It is preventing seams, distorted backgrounds, changed faces, soft details, and misaligned generated layers. Our review of user questions, tutorials, troubleshooting cases, and documented workflows found that selection design and post-generation compositing often affect the final quality as much as the model itself, so a successful workflow needs both AI graphic design techniques and traditional Photoshop control. For repeatable production, a structured AI design workflow can help separate generation, review, compositing, and final delivery.
For teams that need to scale this process beyond one image, Virse positions AI as a professional design collaborator rather than a one-prompt replacement for designers. Its infinite canvas helps teams organize references, connect assets, and express visual intent spatially, while multiple AI Agents can work on separate project modules with shared context. Virse can also retain brand rules, aesthetic preferences, and project knowledge over time, helping creative teams automate repetitive production without giving up brand consistency.
What Is Nano Banana in Photoshop and Which Model Should You Choose?
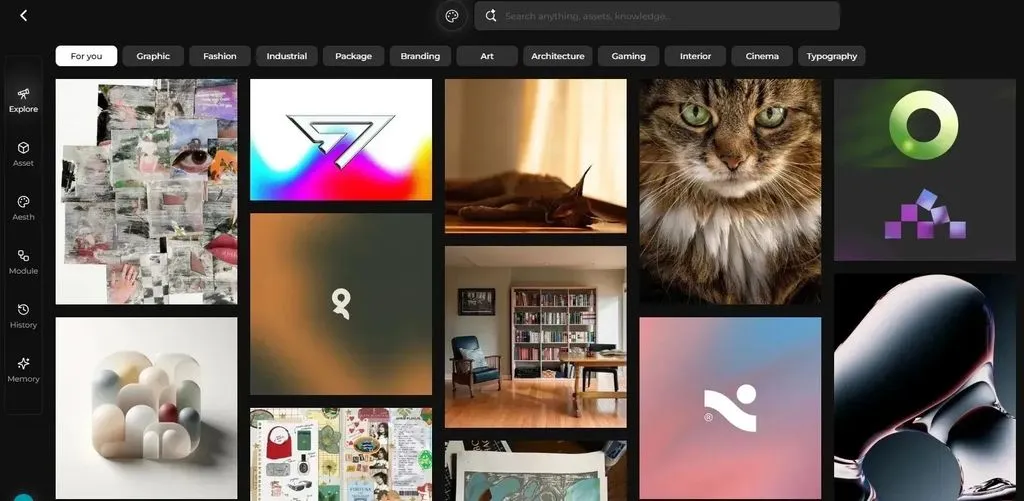
Nano Banana is the name used for Google Gemini’s native image-generation and image-editing models. In Photoshop, these models can be selected inside Generative Fill and used to replace objects, reconstruct scenes, modify lighting, create visual variations, or generate new content inside a selection.
Adobe’s current Photoshop documentation lists Gemini 3.1 with Nano Banana 2, Gemini 3 with Nano Banana Pro, and Gemini 2.5 with Nano Banana among its Partner Models , alongside Adobe Firefly and selected third-party models.
Use Nano Banana 2 for most Photoshop edits
Nano Banana 2 is the best general starting point for rapid image editing, visual iteration, and production-scale experimentation. Google describes it as a high-efficiency model designed to balance speed, image quality, editing ability, and consistency , which makes it suitable for object replacement, background changes, product concepts, and marketing variations.
Use Nano Banana Pro for complex visual instructions
Nano Banana Pro is better suited to demanding compositions, functional design, complex prompts, detailed layouts, and edits involving several visual constraints.
Choose it when the model must coordinate multiple objects, preserve a branded visual language, interpret a complicated scene, or render integrated text. The higher cost means it is usually more efficient to validate the direction with Nano Banana 2 before switching to Pro.
Use the original Nano Banana for simpler legacy workflows
Gemini 2.5 with Nano Banana remains available in Photoshop, but Google now describes it as the legacy model in the family and recommends newer models for improved quality and efficiency , especially for new API-based workflows.
The newest model is not automatically the best choice for every image. A carefully designed selection and prompt can outperform an advanced model given unclear instructions or insufficient visual context.
How to Use Nano Banana in Photoshop Step by Step
Adobe’s native workflow is straightforward: create a selection, open Generative Fill, select a model, enter a prompt, and generate a variation , but professional results require several additional quality-control steps.
1. Duplicate the original image layer
Open the image and duplicate the original layer before making any AI edit.
Keeping an untouched layer makes it possible to restore faces, product details, textures, or background areas if the generated result changes content that should have remained intact.
2. Select the object and surrounding context
Use Object Selection, Selection Brush, Lasso, or another selection tool.
Do not trace the target too tightly. Include enough surrounding area for the model to understand:
- Object scale
- Perspective
- Contact shadows
- Reflections
- Nearby textures
- Light direction
When replacing a chair, for example, include part of the floor and the existing shadow instead of selecting only the chair’s outline.
3. Open Generative Fill and select a Gemini model
Choose Generative Fill from the Contextual Task Bar, then open the model picker.
Select Nano Banana 2 for an initial generation. Move to Nano Banana Pro when the task includes a complicated composition, multiple constraints, detailed text, or demanding brand consistency.
4. Write an instructional prompt
A useful Nano Banana Photoshop prompt should define:
- What should change
- What should replace it
- How the new content should match the image
- What must remain unchanged
Prompt example:
Replace the plastic chair with a dark walnut lounge chair. Match the existing camera angle, warm light from the left, floor contact, and natural shadow. Keep the walls, windows, and surrounding furniture unchanged.
This is more controllable than a vague request such as “make the chair look premium.” The same principle applies to writing stronger AI design prompts: describe relationships and constraints instead of relying on broad style words.
5. Generate and review the complete image
Review every variation at full size.
Do not inspect only the new object. Check:
- Faces and hands
- Background geometry
- Reflections
- Perspective
- Text accuracy
- Shadow direction
- Edge transitions
- Sharpness and grain
A generation may look convincing as a thumbnail while containing obvious defects at delivery resolution.
6. Mask the generated result
Avoid keeping the full rectangular generated layer when only one object is useful.
Add a layer mask and reveal only the successful content. This protects the original face, background, texture, and high-resolution detail while retaining the AI-generated object or scene change.
7. Match color, sharpness, and texture
Use Curves, Color Balance, Selective Color, Camera Raw, blur, sharpening, and noise adjustments to integrate the result.
The objective is not only to hide the selection boundary. The generated area must also match the source image’s contrast, depth, focus, compression, and grain structure.
How to Improve Nano Banana Photoshop Prompts and Selections
Give the model enough visual context
Small selections are useful for controlled edits, but selections that tightly follow an object can prevent the model from reconstructing believable light, texture, and perspective.
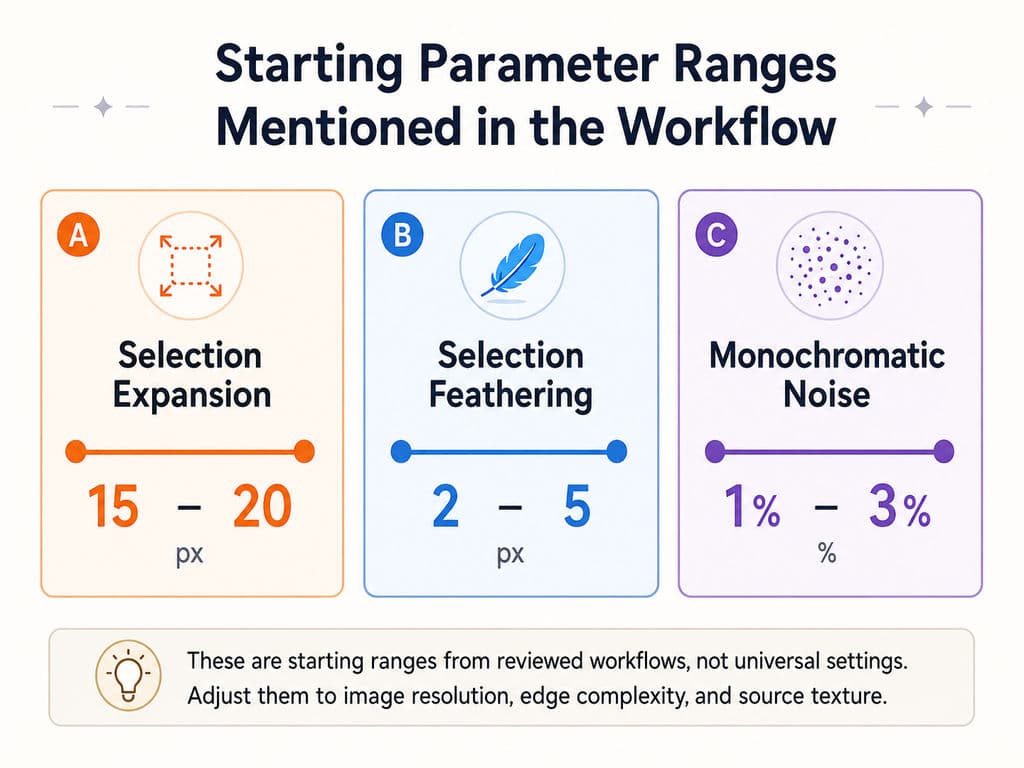
One tutorial workflow reviewed in our research recommends expanding the selection by approximately 15–20 pixels and using 2–5 pixels of feathering. These figures should be treated as starting points rather than fixed rules because the correct amount depends on image resolution, edge complexity, and the size of the subject.
Describe physical properties, not only style
Include materials, lighting, camera angle, color temperature, and shadow behavior.
For example:
Replace the metal lamp with a frosted glass table lamp, maintaining the same scale and perspective. Match the cool window light and cast a soft shadow toward the lower right.
This gives the model visual relationships it can interpret.
State what must remain unchanged
Identity-sensitive prompts should explicitly preserve the subject’s face, pose, hair, body proportions, clothing, and camera angle.
These constraints cannot guarantee perfect preservation, so retain the original layer and plan to mask important details back into the composite.
Change one major variable at a time
A request that changes the background, clothing, typography, product, and lighting simultaneously is difficult to evaluate and reproduce.
A more stable sequence is:
- Replace the background.
- Correct the lighting.
- Modify the product or clothing.
- Add or repair text.
- Complete the Photoshop composite.
Best Nano Banana Photoshop Use Cases and Research Findings
Object and product replacement
Nano Banana is effective when the edit requires semantic understanding rather than nearby-pixel reconstruction. Common examples include replacing furniture, clothing, glasses, packaging, signs, and product materials.
For product design teams, this makes the model useful for testing color, material, and visual-direction alternatives before committing to detailed production work.
Large scene transformations
One documented creative workflow transformed a scene into a nighttime environment and revised signage before using masks, adjustment layers, and Camera Raw for final integration.
The important lesson is that AI established the visual direction quickly, while Photoshop retained control over the subject, local contrast, color balance, and finish.
Removing people and rebuilding backgrounds
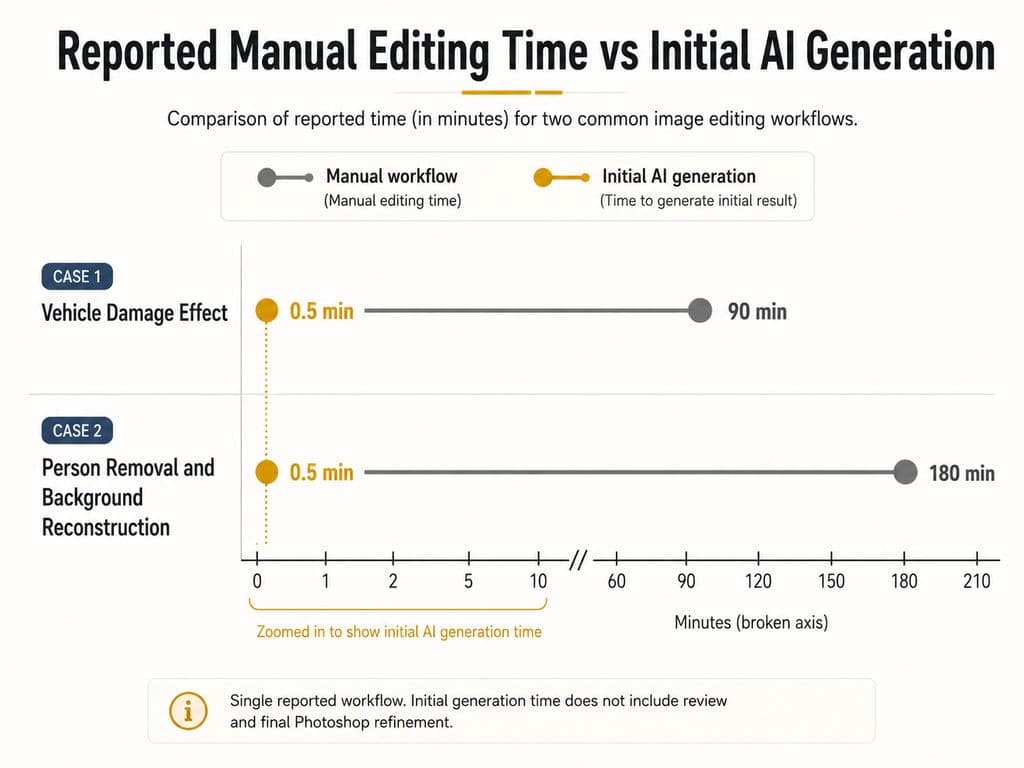
In one reported commercial editing case reviewed during the research, a vehicle-damage effect that previously took about 1.5 hours and a person-removal task that took about 3 hours were reduced to an initial AI generation of roughly 30 seconds.
This is a single reported workflow rather than a controlled benchmark. It nevertheless illustrates where semantic generation can create substantial value: the model completes the first reconstruction, while the designer evaluates realism and performs the final retouching.
Small repairs remain less predictable
Another documented case successfully removed text and reconstructed the background on the first image but failed to reproduce the same quality on a similar image.
This suggests that small selections and texture-sensitive repairs can remain variable. For these tasks, compare Nano Banana with Firefly, Content-Aware Fill, Healing Brush, or Clone Stamp rather than assuming one model will always be superior.
How to Fix Nano Banana Misalignment, Stretching, Seams, and Soft Details
Fix simple layer movement first
Duplicate the generated layer and lower its opacity. Use the Move Tool and arrow keys to check whether the issue is only a horizontal or vertical shift.
This is faster and less destructive than immediately applying automatic transformations.
Use Difference mode to inspect alignment
Set the generated layer to Difference blend mode.
Areas that should be identical become darker when aligned. The newly generated object will remain visibly different, so evaluate the surrounding areas that should not have changed.
Use Auto-Align Layers on a duplicate
If manual alignment is insufficient, keep the original generated layer intact and rasterize only a duplicate when necessary.
Select the reference and generated layers, then choose Edit → Auto-Align Layers. Begin with repositioning before testing modes that may scale, rotate, or distort the image.
Mask everything except the successful content
When the replacement object looks good but the surrounding layer is stretched, mask away the damaged background and retain only the useful object.
This is often more reliable than trying to repair the entire generated region.
Match noise and local sharpness
Some generated areas appear smoother than the source. A reviewed workflow suggests adding approximately 1%–3% monochromatic noise as a starting point, but the correct value should always be matched visually to the source image.
Avoid applying the same noise, blur, or sharpening setting to every image.
Nano Banana vs Firefly vs Photoshop Plugins
Nano Banana is strongest when an edit requires scene interpretation, object replacement, lighting changes, or complex instructions. Firefly is worth comparing for small repairs, Generative Expand, and edge-sensitive reconstruction.
Neither model is a universal winner. In professional workflows, the best model is the one that produces the most usable layer with the least destructive correction.
Most users do not need a plugin or Gemini API key because Photoshop provides native access through Generative Fill. A third-party plugin is relevant only when it offers a verified requirement such as custom automation, additional models, external API access, batch processing, or specialized reference controls.
Before installing one, check the developer, compatibility, privacy policy, image-retention terms, API-key handling, license price, and separate generation costs.
How Much Does Nano Banana Cost in Photoshop?
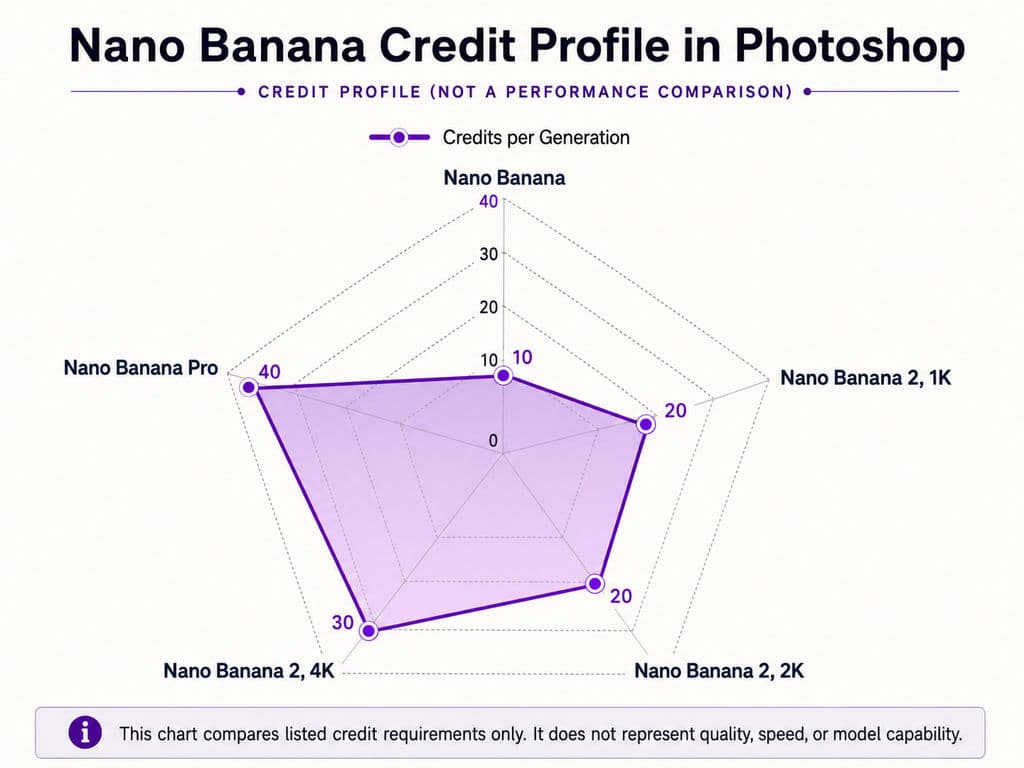
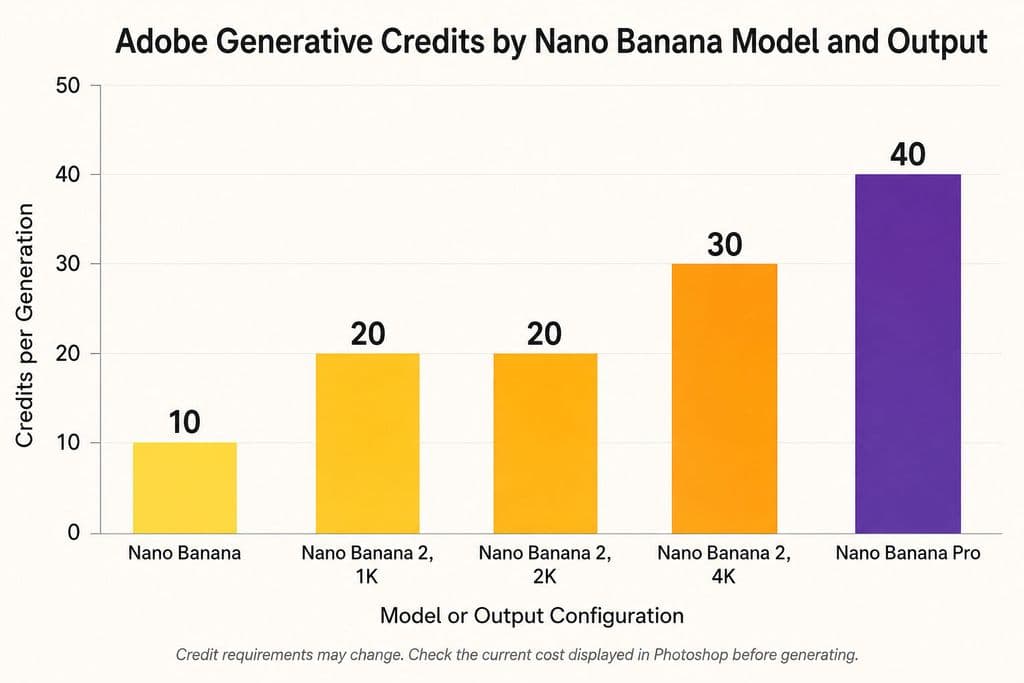
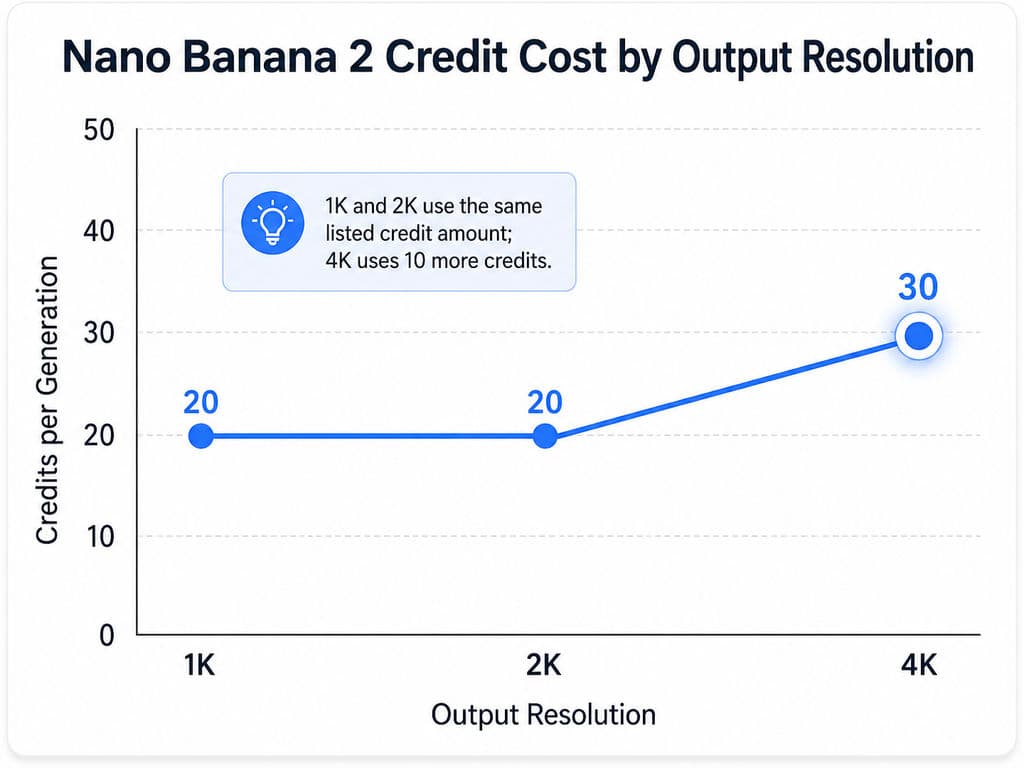
Adobe currently lists Nano Banana at 10 credits per generation, Nano Banana Pro at 40 credits, and Nano Banana 2 at 20 credits for 1K or 2K output and 30 credits for 4K output , although Adobe marks some rates as limited-time pricing and notes that usage can change.
Keep three cost systems separate:
- Native Photoshop generations use Adobe generative credits.
- Gemini API workflows use Google API pricing.
- Third-party plugins may charge for the license, internal credits, external API calls, or all three.
For high-volume production, validate the prompt and selection at a lower-cost setting before generating multiple high-resolution variations.
Conclusion
The best way to use Nano Banana in Photoshop is to treat it as a fast semantic editing layer inside a controlled design workflow: protect the original image, provide sufficient selection context, write specific prompts, inspect every variation, and composite only the successful generated content. This approach captures the speed demonstrated in scene reconstruction and object-replacement cases without sacrificing identity, geometry, or image quality. For teams moving from isolated edits to repeatable creative production, Virse extends the same designer-led principle through an infinite canvas, shared project context, multiple collaborating Agents, and long-term retention of brand and aesthetic knowledge.
FAQ
Why is Nano Banana not showing in Photoshop?
Update Photoshop and open the model picker inside Generative Fill. Check the Partner Models section rather than only the Firefly options. Availability may depend on the Photoshop version, Adobe account, plan, country, region, or staged rollout.
How do I stop Nano Banana from changing a face?
Exclude the face from the selection whenever possible, state that identity and facial features must remain unchanged, and keep the original layer underneath the generation. If the face still changes, mask the original face back into the final composite instead of regenerating the entire person.
Why does Nano Banana look blurry in Photoshop?
The generated region may not match the source image’s resolution, grain, sharpness, or focus. Keep the original high-resolution pixels, mask in only the required generated object, and match local noise, contrast, blur, and sharpening before export.
Is Nano Banana better than Firefly?
Nano Banana is often more useful for semantic object and scene changes, while Firefly may be more suitable for small repairs, expansion, or edge blending. Run both models with the same image, selection, and prompt, then choose the result requiring the least corrective work.
More from the Virse Blog
Workflow

How to Preserve Design Accuracy in AI Mockups Without Endless Cleanup
September 17, 2026 by Yifan Zhao
Workflow
How to Create AI T-Shirt Mockups That Actually Match Your Product
September 17, 2026 by Yifan Zhao
Workflow
How to Create Clothing Mockups That Look Real: 5 Practical Methods
September 17, 2026 by Yifan Zhao